<?xml version="1.0" encoding="utf-8"?><feed xmlns="http://www.w3.org/2005/Atom" xml:lang="en"><generator uri="https://jekyllrb.com/" version="3.10.0">Jekyll</generator><link href="https://aspadax.github.io/feed.xml" rel="self" type="application/atom+xml" /><link href="https://aspadax.github.io/" rel="alternate" type="text/html" hreflang="en" /><updated>2026-09-28T10:11:24+08:00</updated><id>https://aspadax.github.io/feed.xml</id><title type="html">Xinyu Bao</title><subtitle>Notes on software, AI, and things I learn.</subtitle><author><name>Xinyu Bao</name></author><entry xml:lang="zh-CN"><title type="html">一切皆为块：简化笔记应用的数据模型</title><link href="https://aspadax.github.io/cn/articles/posts/opennote-block-design.html" rel="alternate" type="text/html" title="一切皆为块：简化笔记应用的数据模型" /><published>2026-09-10T00:00:00+08:00</published><updated>2026-09-10T00:00:00+08:00</updated><id>https://aspadax.github.io/cn/articles/posts/opennote-block-design-cn</id><content type="html" xml:base="https://aspadax.github.io/cn/articles/posts/opennote-block-design.html"><![CDATA[<p>最初设计 <a href="https://github.com/opennote-org/opennote">OpenNote</a> 时，我采用了一种熟悉的层级结构：集合包含笔记本，笔记本包含笔记。当时，我没有仔细想过这些区分会给数据模型带来什么影响。</p>

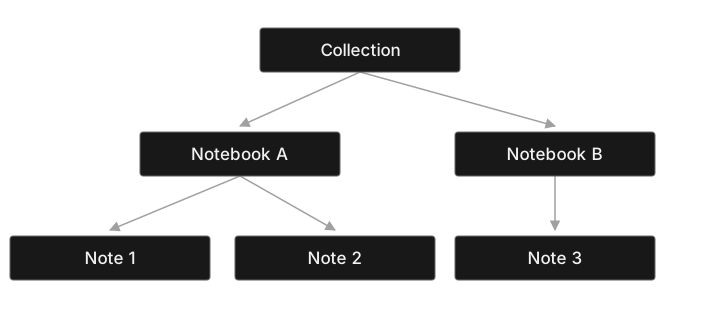
<p><img src="/assets/images/opennote-hierarchy-cn.svg" alt="集合包含笔记本 A 和笔记本 B；笔记本 A 包含笔记 1、笔记 2，笔记本 B 包含笔记 3。" /></p>

<p>这个设计把层级固定为三层。笔记不能包含另一篇笔记；如果要支持子笔记本，就得修改模型，或者增加例外规则。同时，尽管集合、笔记本和笔记很相似，我仍然需要维护三种组织概念。</p>

<p>阅读思源笔记（SiYuan）的代码后，我开始重新思考这个模型的出发点。从本质上说，笔记是一个独立的容器，用来存放文本，也可以容纳其他媒体。笔记应用管理的是这些容器，以及它们之间的关系。</p>

<p>对 OpenNote 来说，集合或笔记本也可以是一篇笔记。例如，一篇「数学」笔记可以包含概述，同时作为更具体的笔记的父节点。称它为笔记本，描述的是它在组织内容时承担的角色；而表达这个角色，只需要一个父子关系，不必为它定义单独的结构类型。</p>

<p>这就是树结构适合这个场景的原因：同一种容器可以出现在任意层级。</p>

<p>思源提供了一个具体的例子，展示如何同时表示标识和关系。它在 SQL 层的 <code class="language-plaintext highlighter-rouge">Block</code> 记录中包含以下字段。<a href="https://github.com/siyuan-note/siyuan/blob/8641553a1f07374001902d3ce773285db1292b2d/kernel/sql/block.go#L39-L62">1</a></p>

<div class="language-go highlighter-rouge"><div class="highlight"><pre class="highlight"><code><span class="k">type</span> <span class="n">Block</span> <span class="k">struct</span> <span class="p">{</span>
    <span class="n">ID</span>       <span class="kt">string</span>
    <span class="n">ParentID</span> <span class="kt">string</span>
    <span class="n">RootID</span>   <span class="kt">string</span>
    <span class="c">// 其余字段省略。</span>
<span class="p">}</span>
</code></pre></div></div>

<p>每个块都有自己的标识、父节点 ID 和文档根节点 ID。这条记录还通过 <code class="language-plaintext highlighter-rouge">Box</code> 保留所属笔记本，通过 <code class="language-plaintext highlighter-rouge">Type</code> 标记内容类型。我的收获是：在一个共用模型中，可以分别表达标识、位置和内容角色。<a href="https://github.com/siyuan-note/siyuan/blob/8641553a1f07374001902d3ce773285db1292b2d/kernel/sql/block.go#L39-L62">1</a></p>

<p><code class="language-plaintext highlighter-rouge">NewTree()</code> 函数展示了这种关系如何建立。它使用同一种 <code class="language-plaintext highlighter-rouge">ast.Node</code> 类型创建文档根节点和段落，赋予它们不同的 <code class="language-plaintext highlighter-rouge">Type</code> 值，再通过 <code class="language-plaintext highlighter-rouge">ret.Root.AppendChild(newPara)</code> 将段落挂到根节点下。我把这种共用节点的思路用到了 OpenNote 的组织层级中；思源的完整模型仍然保留着自己的笔记本和块类型区分。<a href="https://github.com/siyuan-note/siyuan/blob/8641553a1f07374001902d3ce773285db1292b2d/kernel/sql/block.go#L39-L62">1</a> <a href="https://github.com/siyuan-note/siyuan/blob/8641553a1f07374001902d3ce773285db1292b2d/kernel/treenode/tree.go#L70-L83">2</a></p>

<p>在树中，每个元素都是一个节点。根节点没有父节点，其他每个节点都有且只有一个父节点。一个节点可以有多个子节点，没有子节点的节点称为叶节点。父子关系不能形成环。</p>

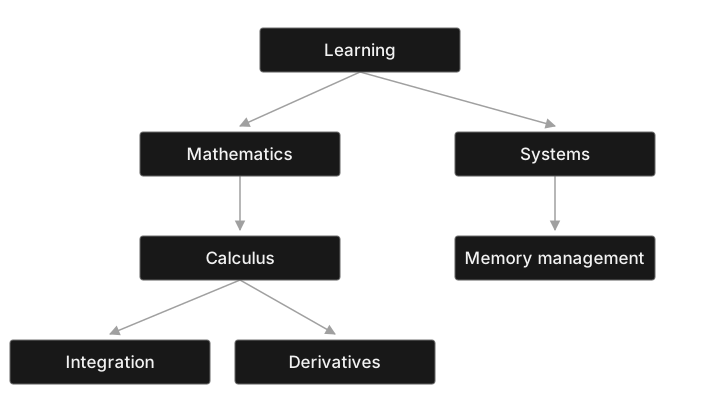
<p>OpenNote 将这种通用容器称为 <code class="language-plaintext highlighter-rouge">Block</code>。下面这个示意层级中的每个方框都是一个块，箭头由父节点指向子节点。<a href="https://github.com/opennote-org/opennote/blob/254fd32510b214539ecc500192f549c1fcf2576b/crates/opennote-models/src/block.rs#L9-L20">3</a></p>

<p><img src="/assets/images/opennote-tree-cn.svg" alt="学习是根节点；数学下有微积分，微积分下有积分和导数；系统下有内存管理。" /></p>

<p>「学习」是根节点。「数学」既是子节点，也是父节点，而且可以拥有自己的内容。「积分」是第四层的叶节点，但以后也可以有子节点。叶节点描述的是它当前的位置，而不是一种永久的类型限制。</p>

<p>我最初的层级结构其实已经是一棵受限的树。重新设计后，我去掉了固定角色和三层的上限。多个顶层块组成多棵树的集合，术语上称为「森林」（forest）。</p>

<p>下面是 OpenNote 的 Rust 结构体，省略了派生属性和大部分注释。<a href="https://github.com/opennote-org/opennote/blob/254fd32510b214539ecc500192f549c1fcf2576b/crates/opennote-models/src/block.rs#L9-L20">3</a></p>

<div class="language-rust highlighter-rouge"><div class="highlight"><pre class="highlight"><code><span class="k">pub</span> <span class="k">struct</span> <span class="n">Block</span> <span class="p">{</span>
    <span class="k">pub</span> <span class="n">id</span><span class="p">:</span> <span class="n">Uuid</span><span class="p">,</span>
    <span class="k">pub</span> <span class="n">parent_id</span><span class="p">:</span> <span class="nb">Option</span><span class="o">&lt;</span><span class="n">Uuid</span><span class="o">&gt;</span><span class="p">,</span>
    <span class="k">pub</span> <span class="n">is_deleted</span><span class="p">:</span> <span class="nb">bool</span><span class="p">,</span> <span class="c1">// 为软删除预留。</span>
    <span class="k">pub</span> <span class="n">payloads</span><span class="p">:</span> <span class="nb">Vec</span><span class="o">&lt;</span><span class="n">Payload</span><span class="o">&gt;</span><span class="p">,</span>
<span class="p">}</span>
</code></pre></div></div>

<p><code class="language-plaintext highlighter-rouge">id</code> 标识当前块。<code class="language-plaintext highlighter-rouge">parent_id</code> 标识它的父节点：<code class="language-plaintext highlighter-rouge">None</code> 表示根节点，<code class="language-plaintext highlighter-rouge">Some(id)</code> 则指向另一个块。<code class="language-plaintext highlighter-rouge">payloads</code> 存放内容。这个定义没有为集合、笔记本和笔记分配不同的类型。<a href="https://github.com/opennote-org/opennote/blob/254fd32510b214539ecc500192f549c1fcf2576b/crates/opennote-models/src/block.rs#L9-L20">3</a></p>

<p>注意，这里没有 <code class="language-plaintext highlighter-rouge">children: Vec&lt;Block&gt;</code> 字段。树不一定要存成嵌套对象。OpenNote 存储父节点 ID，这种表示方式通常称为邻接表（adjacency list）。查找直接子节点，就是查找父节点 ID 匹配的块。下面的 SQL 用来说明代码中的父节点筛选条件，并非应用查询的原文。<a href="https://github.com/opennote-org/opennote/blob/254fd32510b214539ecc500192f549c1fcf2576b/crates/opennote-data/src/database/sqlite.rs#L271-L318">4</a></p>

<div class="language-sql highlighter-rouge"><div class="highlight"><pre class="highlight"><code><span class="k">SELECT</span> <span class="o">*</span>
<span class="k">FROM</span> <span class="n">blocks</span>
<span class="k">WHERE</span> <span class="n">parent_id</span> <span class="o">=</span> <span class="p">:</span><span class="n">block_id</span><span class="p">;</span>
</code></pre></div></div>

<p>OpenNote 通过 ORM 表达这个筛选条件。对于 <code class="language-plaintext highlighter-rouge">ChildrenOf</code>，它会逐层重复查找，收集全部后代节点。熟悉的树遍历，就这样成为获取笔记数据某个分支的方法。<a href="https://github.com/opennote-org/opennote/blob/254fd32510b214539ecc500192f549c1fcf2576b/crates/opennote-data/src/database/sqlite.rs#L271-L318">4</a></p>

<p>遍历也可以反过来进行。<code class="language-plaintext highlighter-rouge">read_block_path()</code> 沿着父节点 ID 向上查找，再将收集到的块反转，得到从根节点到所选块的路径。<a href="https://github.com/opennote-org/opennote/blob/254fd32510b214539ecc500192f549c1fcf2576b/crates/opennote-data/src/database/sqlite.rs#L225-L247">5</a></p>

<p>块内部的载荷（payload）与它的子块是两回事。载荷存储内容及其向量表示，子块则建立组织关系。这样，OpenNote 就能把笔记的层级结构与为检索准备的内容片段分开。<a href="https://github.com/opennote-org/opennote/blob/254fd32510b214539ecc500192f549c1fcf2576b/crates/opennote-models/src/payload.rs#L12-L31">6</a></p>

<p>模型变小了，规则仍然不可少：父节点 ID 必须有效，移动节点不能产生环，删除节点时也需要明确如何处理后代节点。所查看代码中的更新校验会拒绝将块本身设为父节点，但仅靠这项检查，还不足以阻止更长的环。<a href="https://github.com/opennote-org/opennote/blob/254fd32510b214539ecc500192f549c1fcf2576b/crates/opennote-data/src/database/sqlite.rs#L80-L101">7</a></p>

<p>最终，这个模型在减少结构概念的同时，也带来了更大的灵活性。增加一层不再需要发明一种新类型，核心操作可以统一面向块，遍历也可以在整个层级中沿用同一种父子关系。<a href="https://github.com/opennote-org/opennote/blob/254fd32510b214539ecc500192f549c1fcf2576b/crates/opennote-core-logics/src/block.rs#L14-L107">8</a> <a href="https://github.com/opennote-org/opennote/blob/254fd32510b214539ecc500192f549c1fcf2576b/crates/opennote-data/src/database/sqlite.rs#L271-L318">4</a> <a href="https://github.com/opennote-org/opennote/blob/254fd32510b214539ecc500192f549c1fcf2576b/crates/opennote-data/src/database/sqlite.rs#L225-L247">5</a> 对我而言，这让树成为一个实用的设计工具：用一小组规则，表达我希望用户组织笔记的方式。</p>

<p><strong>参考资料</strong></p>

<ol>
  <li><a href="https://github.com/siyuan-note/siyuan/blob/8641553a1f07374001902d3ce773285db1292b2d/kernel/sql/block.go#L39-L62">思源的 Block 记录</a>。</li>
  <li><a href="https://github.com/siyuan-note/siyuan/blob/8641553a1f07374001902d3ce773285db1292b2d/kernel/treenode/tree.go#L70-L83">思源的树构建过程</a>。</li>
  <li><a href="https://github.com/opennote-org/opennote/blob/254fd32510b214539ecc500192f549c1fcf2576b/crates/opennote-models/src/block.rs#L9-L20">OpenNote 的 Block 定义</a>。</li>
  <li><a href="https://github.com/opennote-org/opennote/blob/254fd32510b214539ecc500192f549c1fcf2576b/crates/opennote-data/src/database/sqlite.rs#L271-L318">后代节点查找</a>。</li>
  <li><a href="https://github.com/opennote-org/opennote/blob/254fd32510b214539ecc500192f549c1fcf2576b/crates/opennote-data/src/database/sqlite.rs#L225-L247">父节点路径遍历</a>。</li>
  <li><a href="https://github.com/opennote-org/opennote/blob/254fd32510b214539ecc500192f549c1fcf2576b/crates/opennote-models/src/payload.rs#L12-L31">Payload 定义</a>。</li>
  <li><a href="https://github.com/opennote-org/opennote/blob/254fd32510b214539ecc500192f549c1fcf2576b/crates/opennote-data/src/database/sqlite.rs#L80-L101">Block 校验</a>。</li>
  <li><a href="https://github.com/opennote-org/opennote/blob/254fd32510b214539ecc500192f549c1fcf2576b/crates/opennote-core-logics/src/block.rs#L14-L107">OpenNote 的核心块操作</a>。</li>
</ol>]]></content><author><name>Xinyu Bao</name></author><summary type="html"><![CDATA[用统一的 Block 模型和父子关系，替代 OpenNote 中固定的集合、笔记本、笔记三层结构。]]></summary></entry><entry xml:lang="en"><title type="html">Everything Is a Block: Simplifying a Note-Taking Data Model</title><link href="https://aspadax.github.io/articles/posts/opennote-block-design.html" rel="alternate" type="text/html" title="Everything Is a Block: Simplifying a Note-Taking Data Model" /><published>2026-09-10T00:00:00+08:00</published><updated>2026-09-10T00:00:00+08:00</updated><id>https://aspadax.github.io/articles/posts/opennote-block-design</id><content type="html" xml:base="https://aspadax.github.io/articles/posts/opennote-block-design.html"><![CDATA[<p>When I first designed <a href="https://github.com/opennote-org/opennote">OpenNote</a>, I started with a familiar hierarchy: collections contained notebooks, and notebooks contained notes. I did not think carefully enough about what those distinctions would mean for the data model.</p>

<p><img src="/assets/images/opennote-hierarchy-en.svg" alt="A collection contains Notebook A and Notebook B. Notebook A contains Note 1 and Note 2; Notebook B contains Note 3." /></p>

<p>The design imposed three levels. A note could not contain another note, and supporting a sub-notebook would require changing the model or adding an exception. I also had three organizational concepts to maintain, despite their similarities.</p>

<p>Reading SiYuan’s code helped me reconsider the underlying idea. At its core, a note is an individual container for text and potentially other media. A notebook application manages those containers and their relationships.</p>

<p>For OpenNote, a collection or notebook could be a note as well. A Mathematics note could hold an overview and act as the parent of more specific notes. Calling it a notebook describes an organizational role; expressing that role only requires a parent relationship. I did not need a separate structural type for it.</p>

<p>That is why a tree fit this case: the same kind of container could appear at every level.</p>

<p>SiYuan provides a concrete example of representing identity and relationships together. Its SQL-layer <code class="language-plaintext highlighter-rouge">Block</code> record contains these fields, among others. <a href="https://github.com/siyuan-note/siyuan/blob/8641553a1f07374001902d3ce773285db1292b2d/kernel/sql/block.go#L39-L62">1</a></p>

<div class="language-go highlighter-rouge"><div class="highlight"><pre class="highlight"><code><span class="k">type</span> <span class="n">Block</span> <span class="k">struct</span> <span class="p">{</span>
    <span class="n">ID</span>       <span class="kt">string</span>
    <span class="n">ParentID</span> <span class="kt">string</span>
    <span class="n">RootID</span>   <span class="kt">string</span>
    <span class="c">// Other fields omitted.</span>
<span class="p">}</span>
</code></pre></div></div>

<p>The block has its own identity, a parent ID, and a document-root ID. The record also retains notebook membership in <code class="language-plaintext highlighter-rouge">Box</code> and content classification in <code class="language-plaintext highlighter-rouge">Type</code>. My takeaway was that identity, position, and content role could be represented separately within a shared model. <a href="https://github.com/siyuan-note/siyuan/blob/8641553a1f07374001902d3ce773285db1292b2d/kernel/sql/block.go#L39-L62">1</a></p>

<p>Its <code class="language-plaintext highlighter-rouge">NewTree()</code> function shows the relationship in action. It creates a document root and a paragraph using the same <code class="language-plaintext highlighter-rouge">ast.Node</code> type, gives them different <code class="language-plaintext highlighter-rouge">Type</code> values, and attaches the paragraph with <code class="language-plaintext highlighter-rouge">ret.Root.AppendChild(newPara)</code>. I adapted this shared-node approach to OpenNote’s organizational hierarchy; SiYuan’s complete model still has its own notebook and block-type distinctions. <a href="https://github.com/siyuan-note/siyuan/blob/8641553a1f07374001902d3ce773285db1292b2d/kernel/sql/block.go#L39-L62">1</a> <a href="https://github.com/siyuan-note/siyuan/blob/8641553a1f07374001902d3ce773285db1292b2d/kernel/treenode/tree.go#L70-L83">2</a></p>

<p>In a tree, each item is a node. A root has no parent; every other node has one parent. A node can have several children, and a node with none is called a leaf. Parent–child relationships must not form cycles.</p>

<p>OpenNote calls its common container <code class="language-plaintext highlighter-rouge">Block</code>. Every box in this illustrative hierarchy is a block, and each arrow points from parent to child. <a href="https://github.com/opennote-org/opennote/blob/254fd32510b214539ecc500192f549c1fcf2576b/crates/opennote-models/src/block.rs#L9-L20">3</a></p>

<p><img src="/assets/images/opennote-tree-en.svg" alt="Learning is the root. Mathematics contains Calculus, whose children are Integration and Derivatives. Systems contains Memory management." /></p>

<p>Learning is the root. Mathematics is both a child and a parent, and it can carry its own content. Integration is a leaf at the fourth level, but it could gain children later. Being a leaf describes its current position, not a permanent type restriction.</p>

<p>My original hierarchy was already a restricted tree. The redesign removed its fixed roles and three-level ceiling. Multiple top-level blocks form a collection of trees, technically called a <em>forest</em>.</p>

<p>Here is OpenNote’s Rust structure, with derives and most comments omitted. <a href="https://github.com/opennote-org/opennote/blob/254fd32510b214539ecc500192f549c1fcf2576b/crates/opennote-models/src/block.rs#L9-L20">3</a></p>

<div class="language-rust highlighter-rouge"><div class="highlight"><pre class="highlight"><code><span class="k">pub</span> <span class="k">struct</span> <span class="n">Block</span> <span class="p">{</span>
    <span class="k">pub</span> <span class="n">id</span><span class="p">:</span> <span class="n">Uuid</span><span class="p">,</span>
    <span class="k">pub</span> <span class="n">parent_id</span><span class="p">:</span> <span class="nb">Option</span><span class="o">&lt;</span><span class="n">Uuid</span><span class="o">&gt;</span><span class="p">,</span>
    <span class="k">pub</span> <span class="n">is_deleted</span><span class="p">:</span> <span class="nb">bool</span><span class="p">,</span> <span class="c1">// Reserved for soft deletion.</span>
    <span class="k">pub</span> <span class="n">payloads</span><span class="p">:</span> <span class="nb">Vec</span><span class="o">&lt;</span><span class="n">Payload</span><span class="o">&gt;</span><span class="p">,</span>
<span class="p">}</span>
</code></pre></div></div>

<p><code class="language-plaintext highlighter-rouge">id</code> identifies the block. <code class="language-plaintext highlighter-rouge">parent_id</code> identifies its parent: <code class="language-plaintext highlighter-rouge">None</code> represents a root, while <code class="language-plaintext highlighter-rouge">Some(id)</code> refers to another block. <code class="language-plaintext highlighter-rouge">payloads</code> holds the content. The definition does not assign different types to collections, notebooks, and notes. <a href="https://github.com/opennote-org/opennote/blob/254fd32510b214539ecc500192f549c1fcf2576b/crates/opennote-models/src/block.rs#L9-L20">3</a></p>

<p>Notice that there is no <code class="language-plaintext highlighter-rouge">children: Vec&lt;Block&gt;</code> field. A tree does not have to be stored as nested objects. OpenNote stores parent IDs, a representation commonly called an adjacency list. Finding immediate children means looking for blocks with a matching parent ID. The following SQL illustrates the parent filter used in the code; it is not a verbatim application query. <a href="https://github.com/opennote-org/opennote/blob/254fd32510b214539ecc500192f549c1fcf2576b/crates/opennote-data/src/database/sqlite.rs#L271-L318">4</a></p>

<div class="language-sql highlighter-rouge"><div class="highlight"><pre class="highlight"><code><span class="k">SELECT</span> <span class="o">*</span>
<span class="k">FROM</span> <span class="n">blocks</span>
<span class="k">WHERE</span> <span class="n">parent_id</span> <span class="o">=</span> <span class="p">:</span><span class="n">block_id</span><span class="p">;</span>
</code></pre></div></div>

<p>OpenNote expresses that filter through its ORM. For <code class="language-plaintext highlighter-rouge">ChildrenOf</code>, it then repeats the lookup for each successive level, gathering all descendants. A familiar tree traversal becomes a way to retrieve a branch of notebook data. <a href="https://github.com/opennote-org/opennote/blob/254fd32510b214539ecc500192f549c1fcf2576b/crates/opennote-data/src/database/sqlite.rs#L271-L318">4</a></p>

<p>Traversal works in the other direction too. <code class="language-plaintext highlighter-rouge">read_block_path()</code> follows parent IDs upward, then reverses the collected blocks to produce a path from the root to the selected block. <a href="https://github.com/opennote-org/opennote/blob/254fd32510b214539ecc500192f549c1fcf2576b/crates/opennote-data/src/database/sqlite.rs#L225-L247">5</a></p>

<p>The payloads inside a block are separate from its child blocks. A payload stores content and its vector representation; a child block establishes an organizational relationship. This lets OpenNote keep the notebook hierarchy separate from the pieces of content prepared for retrieval. <a href="https://github.com/opennote-org/opennote/blob/254fd32510b214539ecc500192f549c1fcf2576b/crates/opennote-models/src/payload.rs#L12-L31">6</a></p>

<p>The smaller model still needs rules. Parent IDs must be valid, moves must not create cycles, and deletion needs a policy for descendants. The reviewed update validation rejects a block being its own parent; that check alone does not prevent longer cycles. <a href="https://github.com/opennote-org/opennote/blob/254fd32510b214539ecc500192f549c1fcf2576b/crates/opennote-data/src/database/sqlite.rs#L80-L101">7</a></p>

<p>The outcome was greater flexibility with fewer structural concepts to maintain. Adding another level no longer required inventing another type. Core operations could work on blocks, and traversal could follow the same parent relationship throughout the hierarchy. <a href="https://github.com/opennote-org/opennote/blob/254fd32510b214539ecc500192f549c1fcf2576b/crates/opennote-core-logics/src/block.rs#L14-L107">8</a> <a href="https://github.com/opennote-org/opennote/blob/254fd32510b214539ecc500192f549c1fcf2576b/crates/opennote-data/src/database/sqlite.rs#L271-L318">4</a> <a href="https://github.com/opennote-org/opennote/blob/254fd32510b214539ecc500192f549c1fcf2576b/crates/opennote-data/src/database/sqlite.rs#L225-L247">5</a> For me, this made trees a practical design tool: a small set of rules that matched how I wanted people to organize their notes.</p>

<p><strong>References</strong></p>

<ol>
  <li><a href="https://github.com/siyuan-note/siyuan/blob/8641553a1f07374001902d3ce773285db1292b2d/kernel/sql/block.go#L39-L62">SiYuan’s Block record</a>.</li>
  <li><a href="https://github.com/siyuan-note/siyuan/blob/8641553a1f07374001902d3ce773285db1292b2d/kernel/treenode/tree.go#L70-L83">SiYuan’s tree construction</a>.</li>
  <li><a href="https://github.com/opennote-org/opennote/blob/254fd32510b214539ecc500192f549c1fcf2576b/crates/opennote-models/src/block.rs#L9-L20">OpenNote’s Block definition</a>.</li>
  <li><a href="https://github.com/opennote-org/opennote/blob/254fd32510b214539ecc500192f549c1fcf2576b/crates/opennote-data/src/database/sqlite.rs#L271-L318">Descendant lookup</a>.</li>
  <li><a href="https://github.com/opennote-org/opennote/blob/254fd32510b214539ecc500192f549c1fcf2576b/crates/opennote-data/src/database/sqlite.rs#L225-L247">Parent-path traversal</a>.</li>
  <li><a href="https://github.com/opennote-org/opennote/blob/254fd32510b214539ecc500192f549c1fcf2576b/crates/opennote-models/src/payload.rs#L12-L31">Payload definition</a>.</li>
  <li><a href="https://github.com/opennote-org/opennote/blob/254fd32510b214539ecc500192f549c1fcf2576b/crates/opennote-data/src/database/sqlite.rs#L80-L101">Block validation</a>.</li>
  <li><a href="https://github.com/opennote-org/opennote/blob/254fd32510b214539ecc500192f549c1fcf2576b/crates/opennote-core-logics/src/block.rs#L14-L107">OpenNote core block operations</a>.</li>
</ol>]]></content><author><name>Xinyu Bao</name></author><summary type="html"><![CDATA[How a shared Block model and parent relationships replaced OpenNote's fixed collection–notebook–note hierarchy.]]></summary></entry><entry xml:lang="zh-CN"><title type="html">用 Rust 开发一个基于 AI 的命令行工具</title><link href="https://aspadax.github.io/cn/articles/posts/develop-ai-tool-in-rust.html" rel="alternate" type="text/html" title="用 Rust 开发一个基于 AI 的命令行工具" /><published>2025-07-29T00:00:00+08:00</published><updated>2025-07-29T00:00:00+08:00</updated><id>https://aspadax.github.io/cn/articles/posts/develop-ai-tool-in-rust-cn</id><content type="html" xml:base="https://aspadax.github.io/cn/articles/posts/develop-ai-tool-in-rust.html"><![CDATA[<p>我开发了一个名为 <a href="https://github.com/AspadaX/you">you</a> 的命令行工具——这是一个可以从自然语言输入生成并执行 shell 脚本的命令行界面。这个工具解决了开发者的一个常见痛点：忘记终端命令并不得不切换窗口去搜索文档。</p>

<h2 id="问题上下文切换和命令回忆">问题：上下文切换和命令回忆</h2>

<p>作为一名开发者，我经常在终端工作时忘记特定的命令语法。不断需要切换到其他窗口搜索文档打断了我的工作流程。我需要一个解决方案，能够让我直接在终端中使用自然语言描述来生成和执行 shell 脚本。</p>

<h2 id="评估现有解决方案">评估现有解决方案</h2>

<p>在决定构建自定义解决方案之前，我调研了市场上现有的 AI 驱动的命令行工具。最主要的选择包括 Warp Terminal、Open Interpreter 和 VSCode Copilot，每个都提供了不同的 AI 辅助命令行交互方法。</p>

<h3 id="warp-terminal-分析">Warp Terminal 分析</h3>

<p>Warp 是一个基于 Rust 开发的终端，集成了 AI 功能，提供响应式性能和出色的用户体验。然而，有几个限制让它不符合我的需求：</p>

<ul>
  <li>缺乏远程服务器连接管理功能（截至 2024 年初）</li>
  <li>缺少我在 macOS 默认终端中经常使用的功能</li>
  <li>AI 功能需要订阅，而我只需要基本的命令生成，这可以通过本地开源模型实现</li>
</ul>

<h3 id="open-interpreter-评估">Open Interpreter 评估</h3>

<p>Open Interpreter 提供了一个不依赖特定终端的命令行工具，支持本地模型且无需订阅费用。然而，在长期使用过程中，我发现了几个性能问题：</p>

<ul>
  <li>由于通过 pip 命令安装 Python 依赖项导致启动时间缓慢</li>
  <li>较大的安装包体积，需要下载所有依赖项</li>
  <li>基本命令生成任务消耗过多 token</li>
  <li>依赖网络的安装过程可能需要相当长的时间</li>
</ul>

<p>该工具的功能过于复杂，超出了我对简单 shell 脚本生成和执行的需求。</p>

<h2 id="需求定义和自定义解决方案决策">需求定义和自定义解决方案决策</h2>

<p>在评估这些现有解决方案后，我意识到没有一个完全满足我的特定需求。基于以上分析，我确定了理想命令行工具的三个核心要求：</p>

<ol>
  <li><strong>小尺寸</strong>：最小的安装占用空间和快速部署</li>
  <li><strong>快速响应</strong>：快速启动和执行时间</li>
  <li><strong>可移植性</strong>：无需复杂环境配置的简易安装</li>
</ol>

<p>所需的核心功能很简单：接受自然语言输入，将其发送到 LLM (Large Language Model)，接收 shell 脚本，并在本地执行。基于这一认识，我认为一个针对性的解决方案将更好地满足我的特定需求。</p>

<h2 id="技术选择为什么选择-rust">技术选择：为什么选择 Rust</h2>

<p>明确定义了这些要求后，我需要选择一个能够在所有三个方面都能交付的技术栈。基于几个技术优势，Rust 成为了最佳选择：</p>

<ul>
  <li><strong>小二进制文件大小</strong>：Rust 产生轻量级编译二进制文件（此项目约 2.5MB）</li>
  <li><strong>性能</strong>：快速执行和最小运行时开销</li>
  <li><strong>生态系统成熟度</strong>：可用于 LLM 集成和命令行开发的强大库</li>
  <li><strong>部署简单性</strong>：自包含二进制文件减少安装复杂性</li>
</ul>

<h2 id="开发策略从现有项目中学习">开发策略：从现有项目中学习</h2>

<p>选择 Rust 作为基础后，我需要高效地实现 LLM 集成和命令行解析。我没有从零开始可能需要花费数周时间学习库的复杂性，而是采取了实用的做法，通过研究成功的开源项目并改进它们成熟的方案。</p>

<h3 id="命令行解析">命令行解析</h3>

<p>我参考了 <a href="https://github.com/astral-sh/uv">uv</a>，一个 Python 包管理工具，来学习有效的命令行参数解析方法。通过参考并改进他们的解析器实现，我将开发时间从估计的一周减少到仅仅几分钟的调整。通过学习他人的工作，能够如此快速地完成开发确实令人惊讶。</p>

<h3 id="llm-集成">LLM 集成</h3>

<p>我利用了 async-openai GitHub 仓库中提供的完整<a href="https://github.com/64bit/async-openai">示例</a>。聊天完成示例作为基础，我将其适应用于 shell 脚本生成，再次通过代码重用和修改节省了大量开发时间。</p>

<h2 id="技术实现基础">技术实现基础</h2>

<p>这种以学习为重点的方法让我基于三个关键的 Rust 库构建，它们构成了工具的骨干：</p>

<h3 id="async-openai">async-openai</h3>
<p>提供与 OpenAI 兼容的 API，支持 Azure OpenAI，实现与各种 LLM 提供商的无缝集成。</p>

<h3 id="clap">clap</h3>
<p>处理命令行参数解析，具有强大的功能支持和清晰的语法。</p>

<h3 id="tokio">tokio</h3>
<p>启用异步编程功能，并在需要时为同步操作提供阻塞 API。</p>

<h2 id="功能设计理念">功能设计理念</h2>

<h3 id="双重输出解释和命令">双重输出：解释和命令</h3>

<p>该工具为每个请求生成解释和 shell 脚本，有两个作用：</p>

<ol>
  <li><strong>用户理解</strong>：解释帮助用户理解生成的命令并从中学习</li>
  <li><strong>LLM 推理增强</strong>：基于思维链 (Chain-of-Thought, CoT) 原理，提供解释可能改善 LLM 的推理过程</li>
</ol>

<p>以下是工具工作方式的快速概览：</p>
<div class="language-bash highlighter-rouge"><div class="highlight"><pre class="highlight"><code><span class="o">(</span>base<span class="o">)</span> xinyubao@Xinyu-MacBook-Air articles % you <span class="nt">-r</span> <span class="s2">"find the largest file under the current dir"</span>
<span class="o">&gt;&gt;</span> Cache has been enabled.
<span class="o">&gt;&gt;</span> Your input: <span class="o">(</span>y <span class="k">for </span>executing the <span class="nb">command</span>, or <span class="nb">type </span>to hint LLM<span class="o">)</span>
    <span class="o">&gt;</span> fd <span class="nt">-t</span> f <span class="nb">.</span> | xargs <span class="nb">ls</span> <span class="nt">-lS</span> | <span class="nb">head</span> <span class="nt">-n</span> 1
        <span class="k">*</span> Use fd to find all files, list them by size <span class="k">in </span>descending order, and show the first <span class="o">(</span>largest<span class="o">)</span> one.
</code></pre></div></div>

<h3 id="结构化输出实现">结构化输出实现</h3>

<p>我利用 JSON 模式进行 LLM 响应，以确保对输出的程序化控制。这种结构化方法允许程序直接访问每个字段（解释和 shell_script）中的数据，无需额外解析，显著提高了可靠性和可维护性。</p>

<h2 id="高级功能和能力">高级功能和能力</h2>

<h3 id="多轮对话">多轮对话</h3>

<p>除了单命令生成外，该工具还支持跨多轮的上下文对话。这允许用户在一个会话中发出连续命令，LLM 保持对先前交互的感知，以获得更符合上下文的响应。</p>

<div class="language-bash highlighter-rouge"><div class="highlight"><pre class="highlight"><code><span class="o">(</span>base<span class="o">)</span> xinyubao@Xinyu-MacBook-Air articles % you <span class="nt">-r</span>
<span class="o">&gt;&gt;</span> Yes, boss. What can I <span class="k">do for </span>you: find the largest file under the current <span class="nb">dir</span>
<span class="o">&gt;&gt;</span> Your input: <span class="o">(</span>y <span class="k">for </span>executing the <span class="nb">command</span>, or <span class="nb">type </span>to hint LLM<span class="o">)</span>
    <span class="o">&gt;</span> fd <span class="nt">-t</span> f <span class="nb">.</span> | xargs <span class="nb">ls</span> <span class="nt">-lS</span> | <span class="nb">head</span> <span class="nt">-n</span> 1
        <span class="k">*</span> Use fd to find all files, list them by size <span class="k">in </span>descending order, and show the largest one.
 y
<span class="o">&gt;&gt;</span> Start executing <span class="nb">command</span>: fd <span class="nt">-t</span> f <span class="nb">.</span> | xargs <span class="nb">ls</span> <span class="nt">-lS</span> | <span class="nb">head</span> <span class="nt">-n</span> 1
    <span class="nt">-rw-r--r--</span>  1 xinyubao  staff  7312 Jul 29 13:30 post.md
<span class="o">&gt;&gt;</span> Finished executing <span class="nb">command</span>: fd <span class="nt">-t</span> f <span class="nb">.</span> | xargs <span class="nb">ls</span> <span class="nt">-lS</span> | <span class="nb">head</span> <span class="nt">-n</span> 1
<span class="o">&gt;&gt;</span> Commands had been executed successfully.
<span class="o">&gt;&gt;</span> Boss, what <span class="k">else </span>can I <span class="k">do for </span>you <span class="o">(</span><span class="nb">type </span>to instruct, e to <span class="nb">exit</span>, or enter w to save the commands so far<span class="o">)</span>: search <span class="k">in </span>the file <span class="k">for</span> <span class="sb">`</span>async-openai<span class="sb">`</span>
<span class="o">&gt;&gt;</span> Your input: <span class="o">(</span>y <span class="k">for </span>executing the <span class="nb">command</span>, or <span class="nb">type </span>to hint LLM<span class="o">)</span>
    <span class="o">&gt;</span> <span class="nb">grep</span> <span class="nt">-n</span> <span class="s2">"async-openai"</span> post.md
        <span class="k">*</span> Search <span class="k">for </span>the string <span class="s1">'async-openai'</span> <span class="k">in </span>the file post.md and show matching lines with line numbers.
 y
<span class="o">&gt;&gt;</span> Start executing <span class="nb">command</span>: <span class="nb">grep</span> <span class="nt">-n</span> <span class="s2">"async-openai"</span> post.md
    61:I utilized the <span class="nb">complete</span> <span class="o">[</span>examples]<span class="o">(</span>https://github.com/64bit/async-openai<span class="o">)</span> provided <span class="k">in </span>the async-openai GitHub repository. The chat completion examples served as a foundation that I adapted <span class="k">for </span>shell script generation, again saving significant development <span class="nb">time </span>through code reuse and modification.
    67:### async-openai
<span class="o">&gt;&gt;</span> Finished executing <span class="nb">command</span>: <span class="nb">grep</span> <span class="nt">-n</span> <span class="s2">"async-openai"</span> post.md
<span class="o">&gt;&gt;</span> Commands had been executed successfully.
<span class="o">&gt;&gt;</span> Boss, what <span class="k">else </span>can I <span class="k">do for </span>you <span class="o">(</span><span class="nb">type </span>to instruct, e to <span class="nb">exit</span>, or enter w to save the commands so far<span class="o">)</span>: 
</code></pre></div></div>

<h3 id="命令重用和持久化">命令重用和持久化</h3>

<p>认识到 LLM 是概率性的而生成的命令是确定性的，我实现了一个命令保存和重用系统。用户可以保存特别有效的命令并稍后重用它们，将 LLM 生成的创造性与传统确定性程序的可靠性相结合。</p>

<h2 id="最终解决方案的优势">最终解决方案的优势</h2>

<p>完成的基于 Rust 的命令行工具实现了所有原始要求：</p>

<ul>
  <li><strong>轻量级</strong>：2.5MB 编译二进制文件，系统依赖最少</li>
  <li><strong>快速</strong>：快速启动和响应时间，无 Python 环境开销</li>
  <li><strong>可移植</strong>：使用 rustls 的单二进制安装消除了对外部 TLS 库的需求</li>
  <li><strong>易于安装</strong>：用户可以运行安装脚本而无需担心环境配置</li>
</ul>

<p>该工具成功地在自然语言输入和 shell 命令执行之间架起了桥梁，提供了一个专注的解决方案，优先考虑性能和可用性而非功能复杂性。</p>]]></content><author><name>Xinyu Bao</name></author><category term="Rust" /><category term="CLI" /><category term="Programming" /><category term="AI" /><category term="Learning" /><summary type="html"><![CDATA[我开发了一个名为 you 的命令行工具——这是一个可以从自然语言输入生成并执行 shell 脚本的命令行界面。这个工具解决了开发者的一个常见痛点：忘记终端命令并不得不切换窗口去搜索文档。]]></summary></entry><entry xml:lang="en"><title type="html">Develop an AI-Based CLI Tool in Rust</title><link href="https://aspadax.github.io/articles/posts/develop-ai-tool-in-rust.html" rel="alternate" type="text/html" title="Develop an AI-Based CLI Tool in Rust" /><published>2025-07-29T00:00:00+08:00</published><updated>2025-07-29T00:00:00+08:00</updated><id>https://aspadax.github.io/articles/posts/develop-ai-tool-in-rust</id><content type="html" xml:base="https://aspadax.github.io/articles/posts/develop-ai-tool-in-rust.html"><![CDATA[<p>I developed a CLI tool called <a href="https://github.com/AspadaX/you">you</a> — a command-line interface that generates and executes shell scripts from natural language input. This tool addresses a common developer frustration: forgetting terminal commands and having to switch windows to search documentation.</p>

<h2 id="the-problem-context-switching-and-command-recall">The Problem: Context Switching and Command Recall</h2>

<p>As a developer, I frequently found myself forgetting specific command syntax while working in the terminal. The constant need to switch windows and search through documentation disrupted my workflow and reduced productivity. I needed a solution that would allow me to generate and execute shell scripts directly from my terminal using natural language descriptions.</p>

<h2 id="evaluating-existing-solutions">Evaluating Existing Solutions</h2>

<p>Before committing to building a custom solution, I thoroughly researched existing AI-powered CLI tools in the market. The most prominent options included Warp Terminal, Open Interpreter, and VSCode Copilot, each offering different approaches to AI-assisted command line interaction.</p>

<h3 id="warp-terminal-analysis">Warp Terminal Analysis</h3>

<p>Warp is a Rust-based terminal with integrated AI capabilities that provides responsive performance and an engaging user experience. However, several limitations made it unsuitable for my needs:</p>

<ul>
  <li>Lack of remote server bookmarking support (as of early 2024)</li>
  <li>Missing features that I regularly used in the macOS default terminal</li>
  <li>Subscription requirement for AI features, while I only needed basic command generation that could be achieved with local open-source models</li>
</ul>

<h3 id="open-interpreter-evaluation">Open Interpreter Evaluation</h3>

<p>Open Interpreter offers a CLI tool that works independently of terminal choice and supports local models without subscription costs. However, after extended use, several performance issues became apparent:</p>

<ul>
  <li>Slow startup time due to Python dependency installation via pip commands</li>
  <li>Large installation footprint requiring all dependencies to be downloaded</li>
  <li>High token consumption for basic command generation tasks</li>
  <li>Network-dependent installation process that could take considerable time</li>
</ul>

<p>The tool’s extensive feature set exceeded my requirements for simple shell script generation and execution.</p>

<h2 id="requirements-definition-and-custom-solution-decision">Requirements Definition and Custom Solution Decision</h2>

<p>After evaluating these existing solutions, I realized that none fully met my specific needs. Based on this analysis, I identified three core requirements for an ideal CLI tool:</p>

<ol>
  <li><strong>Small size</strong>: Minimal installation footprint and fast deployment</li>
  <li><strong>Fast response</strong>: Quick startup and execution times</li>
  <li><strong>Portability</strong>: Easy installation without complex environment configuration</li>
</ol>

<p>The core functionality needed was straightforward: accept natural language input, send it to an LLM, receive a shell script, and execute it locally. This realization led me to conclude that a custom, focused solution would better serve my specific needs.</p>

<h2 id="technology-selection-why-rust">Technology Selection: Why Rust</h2>

<p>With these requirements clearly defined, I needed to select a technology stack that could deliver on all three fronts. Rust emerged as the optimal choice based on several technical advantages:</p>

<ul>
  <li><strong>Small binary size</strong>: Rust produces lightweight compiled binaries (approximately 2.5MB for this project)</li>
  <li><strong>Performance</strong>: Fast execution and minimal runtime overhead</li>
  <li><strong>Ecosystem maturity</strong>: Robust libraries available for LLM integration and CLI development</li>
  <li><strong>Deployment simplicity</strong>: Self-contained binaries reduce installation complexity</li>
</ul>

<h2 id="development-strategy-learning-from-existing-projects">Development Strategy: Learning from Existing Projects</h2>

<p>With Rust selected as the foundation, I faced the challenge of implementing LLM integration and CLI parsing efficiently. Rather than starting from scratch and potentially spending weeks learning library intricacies, I adopted a pragmatic approach by studying successful open-source projects and adapting their proven patterns.</p>

<h3 id="command-line-parsing">Command Line Parsing</h3>

<p>I referenced <a href="https://github.com/astral-sh/uv">uv</a>, a Python package management tool, to understand effective CLI argument parsing patterns. By copying and adapting their parser implementation, I reduced development time from an estimated a week to just a few minutes of adjustments. It is quiet amazing to realize how fast it can be when I do my works based on others’ works and learn stuff from others.</p>

<h3 id="llm-integration">LLM Integration</h3>

<p>I utilized the complete <a href="https://github.com/64bit/async-openai">examples</a> provided in the async-openai GitHub repository. The chat completion examples served as a foundation that I adapted for shell script generation, again saving significant development time through code reuse and modification.</p>

<h2 id="technical-implementation-foundation">Technical Implementation Foundation</h2>

<p>This learning-focused approach led me to build upon three key Rust libraries that form the backbone of the tool:</p>

<h3 id="async-openai">async-openai</h3>
<p>Provides OpenAI-compatible APIs with Azure OpenAI support, enabling seamless integration with various LLM providers.</p>

<h3 id="clap">clap</h3>
<p>Handles command-line argument parsing with robust feature support and clear syntax.</p>

<h3 id="tokio">tokio</h3>
<p>Enables asynchronous programming capabilities and provides blocking APIs for synchronous operations when needed.</p>

<h2 id="feature-design-philosophy">Feature Design Philosophy</h2>

<h3 id="dual-output-explanation-and-commands">Dual Output: Explanation and Commands</h3>

<p>The tool generates both explanations and shell scripts for each request, serving two purposes:</p>

<ol>
  <li><strong>User Understanding</strong>: Explanations help users comprehend the generated commands and learn from them</li>
  <li><strong>LLM Reasoning Enhancement</strong>: Based on Chain-of-Draft (CoD) principles, providing explanations may improve the LLM’s reasoning process</li>
</ol>

<p>Here is a quick overview of how the tool works like:</p>
<div class="language-bash highlighter-rouge"><div class="highlight"><pre class="highlight"><code><span class="o">(</span>base<span class="o">)</span> xinyubao@Xinyu-MacBook-Air articles % you <span class="nt">-r</span> <span class="s2">"find the largest file under the current dir"</span>
<span class="o">&gt;&gt;</span> Cache has been enabled.
<span class="o">&gt;&gt;</span> Your input: <span class="o">(</span>y <span class="k">for </span>executing the <span class="nb">command</span>, or <span class="nb">type </span>to hint LLM<span class="o">)</span>
    <span class="o">&gt;</span> fd <span class="nt">-t</span> f <span class="nb">.</span> | xargs <span class="nb">ls</span> <span class="nt">-lS</span> | <span class="nb">head</span> <span class="nt">-n</span> 1
        <span class="k">*</span> Use fd to find all files, list them by size <span class="k">in </span>descending order, and show the first <span class="o">(</span>largest<span class="o">)</span> one.
</code></pre></div></div>

<h3 id="structured-output-implementation">Structured Output Implementation</h3>

<p>I made use of JSON mode for LLM responses to ensure programmatic control over outputs. This structured approach allows the program to directly access data in each field (explanation and shell_script) without requiring additional parsing, significantly improving reliability and maintainability.</p>

<h2 id="advanced-features-and-capabilities">Advanced Features and Capabilities</h2>

<h3 id="multi-round-conversations">Multi-Round Conversations</h3>

<p>Beyond single-command generation, the tool supports contextual conversations across multiple rounds. This allows users to issue sequential commands within one session, with the LLM maintaining awareness of previous interactions for more contextually appropriate responses.</p>

<div class="language-bash highlighter-rouge"><div class="highlight"><pre class="highlight"><code><span class="o">(</span>base<span class="o">)</span> xinyubao@Xinyu-MacBook-Air articles % you <span class="nt">-r</span>
<span class="o">&gt;&gt;</span> Yes, boss. What can I <span class="k">do for </span>you: find the largest file under the current <span class="nb">dir</span>
<span class="o">&gt;&gt;</span> Your input: <span class="o">(</span>y <span class="k">for </span>executing the <span class="nb">command</span>, or <span class="nb">type </span>to hint LLM<span class="o">)</span>
    <span class="o">&gt;</span> fd <span class="nt">-t</span> f <span class="nb">.</span> | xargs <span class="nb">ls</span> <span class="nt">-lS</span> | <span class="nb">head</span> <span class="nt">-n</span> 1
        <span class="k">*</span> Use fd to find all files, list them by size <span class="k">in </span>descending order, and show the largest one.
 y
<span class="o">&gt;&gt;</span> Start executing <span class="nb">command</span>: fd <span class="nt">-t</span> f <span class="nb">.</span> | xargs <span class="nb">ls</span> <span class="nt">-lS</span> | <span class="nb">head</span> <span class="nt">-n</span> 1
    <span class="nt">-rw-r--r--</span>  1 xinyubao  staff  7312 Jul 29 13:30 post.md
<span class="o">&gt;&gt;</span> Finished executing <span class="nb">command</span>: fd <span class="nt">-t</span> f <span class="nb">.</span> | xargs <span class="nb">ls</span> <span class="nt">-lS</span> | <span class="nb">head</span> <span class="nt">-n</span> 1
<span class="o">&gt;&gt;</span> Commands had been executed successfully.
<span class="o">&gt;&gt;</span> Boss, what <span class="k">else </span>can I <span class="k">do for </span>you <span class="o">(</span><span class="nb">type </span>to instruct, e to <span class="nb">exit</span>, or enter w to save the commands so far<span class="o">)</span>: search <span class="k">in </span>the file <span class="k">for</span> <span class="sb">`</span>async-openai<span class="sb">`</span>
<span class="o">&gt;&gt;</span> Your input: <span class="o">(</span>y <span class="k">for </span>executing the <span class="nb">command</span>, or <span class="nb">type </span>to hint LLM<span class="o">)</span>
    <span class="o">&gt;</span> <span class="nb">grep</span> <span class="nt">-n</span> <span class="s2">"async-openai"</span> post.md
        <span class="k">*</span> Search <span class="k">for </span>the string <span class="s1">'async-openai'</span> <span class="k">in </span>the file post.md and show matching lines with line numbers.
 y
<span class="o">&gt;&gt;</span> Start executing <span class="nb">command</span>: <span class="nb">grep</span> <span class="nt">-n</span> <span class="s2">"async-openai"</span> post.md
    61:I utilized the <span class="nb">complete</span> <span class="o">[</span>examples]<span class="o">(</span>https://github.com/64bit/async-openai<span class="o">)</span> provided <span class="k">in </span>the async-openai GitHub repository. The chat completion examples served as a foundation that I adapted <span class="k">for </span>shell script generation, again saving significant development <span class="nb">time </span>through code reuse and modification.
    67:### async-openai
<span class="o">&gt;&gt;</span> Finished executing <span class="nb">command</span>: <span class="nb">grep</span> <span class="nt">-n</span> <span class="s2">"async-openai"</span> post.md
<span class="o">&gt;&gt;</span> Commands had been executed successfully.
<span class="o">&gt;&gt;</span> Boss, what <span class="k">else </span>can I <span class="k">do for </span>you <span class="o">(</span><span class="nb">type </span>to instruct, e to <span class="nb">exit</span>, or enter w to save the commands so far<span class="o">)</span>: 
</code></pre></div></div>

<h3 id="command-reuse-and-persistence">Command Reuse and Persistence</h3>

<p>Recognizing that LLMs are probabilistic while generated commands are deterministic, I implemented a command saving and reuse system. Users can save particularly effective commands and reuse them later, combining the creativity of LLM generation with the reliability of traditional deterministic programs.</p>

<h2 id="final-solution-benefits">Final Solution Benefits</h2>

<p>The completed Rust-based CLI tool achieves all original requirements:</p>

<ul>
  <li><strong>Lightweight</strong>: 2.5MB compiled binary with minimal system dependencies</li>
  <li><strong>Fast</strong>: Quick startup and response times without Python environment overhead</li>
  <li><strong>Portable</strong>: Single binary installation using rustls eliminates the need for external TLS libraries</li>
  <li><strong>Easy Installation</strong>: Users can run the installation script without worrying about environment configuration</li>
</ul>

<p>The tool successfully bridges the gap between natural language input and shell command execution, providing a focused solution that prioritizes performance and usability over feature complexity.</p>]]></content><author><name>Xinyu Bao</name></author><category term="Rust" /><category term="CLI" /><category term="Programming" /><category term="AI" /><category term="Learning" /><summary type="html"><![CDATA[I developed a CLI tool called you — a command-line interface that generates and executes shell scripts from natural language input. This tool addresses a common developer frustration: forgetting terminal commands and having to switch windows to search documentation.]]></summary></entry><entry xml:lang="en"><title type="html">Develop a Rust Macro for Automating Data Extraction</title><link href="https://aspadax.github.io/articles/posts/learning-rust-macros.html" rel="alternate" type="text/html" title="Develop a Rust Macro for Automating Data Extraction" /><published>2025-07-16T00:00:00+08:00</published><updated>2025-07-16T00:00:00+08:00</updated><id>https://aspadax.github.io/articles/posts/learning-rust-macros</id><content type="html" xml:base="https://aspadax.github.io/articles/posts/learning-rust-macros.html"><![CDATA[<p>Not just procedural macros, but macros in general, has been a difficult topic for me since my first hands-on experience with Rust. I never understood why they needed such complex syntax and abstraction layers. My perspective didn’t change until I started trying to improve my crate’s ergonomics.</p>

<h2 id="the-problem-too-much-boilerplate">The Problem: Too Much Boilerplate</h2>

<p>I created a crate for easily populating Rust structs by leveraging LLMs. In the past, when I needed to extract data or something structural from an LLM, I would need to define a struct, set up boilerplate code for calling the LLMs, and then write my prompts. This was distracting when coding. Therefore, I made <a href="https://github.com/AspadaX/secretary">secretary</a>.</p>

<p>The end result is amazing. I can now skip all these repetitive steps and simply define a struct like this:</p>

<div class="language-rust highlighter-rouge"><div class="highlight"><pre class="highlight"><code><span class="nd">#[derive(Task,</span> <span class="nd">Serialize,</span> <span class="nd">Deserialize,</span> <span class="nd">Debug)]</span>
<span class="k">struct</span> <span class="n">Details</span> <span class="p">{</span>
    <span class="nd">#[task(instruction</span> <span class="nd">=</span> <span class="s">"Extract the price as a float"</span><span class="nd">)]</span>
    <span class="k">pub</span> <span class="n">price</span><span class="p">:</span> <span class="nb">f64</span><span class="p">,</span>

    <span class="nd">#[task(instruction</span> <span class="nd">=</span> <span class="s">"Extract the product category or type"</span><span class="nd">)]</span>
    <span class="k">pub</span> <span class="n">category</span><span class="p">:</span> <span class="nb">String</span><span class="p">,</span>

    <span class="nd">#[task(instruction</span> <span class="nd">=</span> <span class="s">"Extract the brand name if mentioned"</span><span class="nd">)]</span>
    <span class="k">pub</span> <span class="n">brand</span><span class="p">:</span> <span class="nb">Option</span><span class="o">&lt;</span><span class="nb">String</span><span class="o">&gt;</span><span class="p">,</span>
<span class="p">}</span>

<span class="cd">/// Example data structure for extracting product information</span>
<span class="nd">#[derive(Task,</span> <span class="nd">Serialize,</span> <span class="nd">Deserialize,</span> <span class="nd">Debug)]</span>
<span class="k">struct</span> <span class="n">ProductExtraction</span> <span class="p">{</span>
    <span class="cd">/// Product data fields with specific extraction instructions</span>
    <span class="nd">#[task(instruction</span> <span class="nd">=</span> <span class="s">"Extract the product name or title"</span><span class="nd">)]</span>
    <span class="k">pub</span> <span class="n">name</span><span class="p">:</span> <span class="nb">String</span><span class="p">,</span>

    <span class="nd">#[task(instruction</span> <span class="nd">=</span> <span class="s">"Extract key features or description"</span><span class="nd">)]</span>
    <span class="k">pub</span> <span class="n">description</span><span class="p">:</span> <span class="nb">String</span><span class="p">,</span>

    <span class="nd">#[task(instruction</span> <span class="nd">=</span> <span class="s">"Determine if the product is in stock (true/false)"</span><span class="nd">)]</span>
    <span class="k">pub</span> <span class="n">in_stock</span><span class="p">:</span> <span class="nb">bool</span><span class="p">,</span>

    <span class="k">pub</span> <span class="n">details</span><span class="p">:</span> <span class="n">Details</span><span class="p">,</span>
<span class="p">}</span>
</code></pre></div></div>

<h2 id="understanding-procedural-macros">Understanding Procedural Macros</h2>

<p>If you’ve used <code class="language-plaintext highlighter-rouge">serde</code> or <code class="language-plaintext highlighter-rouge">clap</code>, you’ll notice the attribute annotations above the struct and fields. In Rust, these are procedural macros. During compilation, these macros are expanded to generate additional code before the main compilation phase, so that the generated implementations can be used during runtime without manually writing all of them. The main purpose of using a macro is to reduce boilerplate code and minimize the chance of repetitive errors.</p>

<p>Rust has two kinds of macros. The first type is declarative macros, created with <code class="language-plaintext highlighter-rouge">macro_rules!</code>. This is what you usually see when using <code class="language-plaintext highlighter-rouge">vec![]</code>, <code class="language-plaintext highlighter-rouge">println!()</code>, or <code class="language-plaintext highlighter-rouge">info!()</code>. You just declare them and use them in your project. The second type is called procedural macros (sometimes abbreviated as “proc macros”). Procedural macros need to be set up as an independent crate and have syntax that’s more “Rusty” than declarative macros. To use a procedural macro, you need to include it in your <code class="language-plaintext highlighter-rouge">Cargo.toml</code> as if it’s a library. Despite the nuances between them, they all do the same thing - manipulate code before compilation.</p>

<h2 id="core-concept-code-as-data">Core Concept: Code as Data</h2>

<p>Here’s the key insight that helped me understand macros: if a function processes data as input and produces processed data as output, a macro processes code as input and produces transformed code as output.</p>

<p>Let me illustrate this with a practical example. In the following simplified code snippet, we’re using an LLM to extract data for us. The raw text is data input, and the result struct is processed data:</p>
<div class="language-rust highlighter-rouge"><div class="highlight"><pre class="highlight"><code><span class="nd">#[tokio::main]</span>
<span class="k">async</span> <span class="k">fn</span> <span class="nf">main</span><span class="p">()</span> <span class="k">-&gt;</span> <span class="nb">Result</span><span class="o">&lt;</span><span class="p">(),</span> <span class="nb">Box</span><span class="o">&lt;</span><span class="k">dyn</span> <span class="nn">std</span><span class="p">::</span><span class="nn">error</span><span class="p">::</span><span class="n">Error</span> <span class="o">+</span> <span class="nb">Send</span> <span class="o">+</span> <span class="nb">Sync</span> <span class="o">+</span> <span class="k">'static</span><span class="o">&gt;&gt;</span> <span class="p">{</span>
    <span class="c1">// Create a task instance</span>
    <span class="k">let</span> <span class="n">task</span> <span class="o">=</span> <span class="nn">ProductExtraction</span><span class="p">::</span><span class="nf">new</span><span class="p">();</span>

    <span class="c1">// Additional instructions for the LLM</span>
    <span class="k">let</span> <span class="n">additional_instructions</span> <span class="o">=</span> <span class="nd">vec!</span><span class="p">[</span>
        <span class="s">"Be precise with numerical values"</span><span class="nf">.to_string</span><span class="p">(),</span>
        <span class="s">"Use 'Unknown' for missing information"</span><span class="nf">.to_string</span><span class="p">(),</span>
        <span class="s">"Ensure boolean values are accurate"</span><span class="nf">.to_string</span><span class="p">(),</span>
    <span class="p">];</span>

    <span class="c1">// Example product description text</span>
    <span class="k">let</span> <span class="n">product_text</span> <span class="o">=</span> <span class="s">"
        Apple MacBook Pro 16-inch - $2,499
        
        The latest MacBook Pro features the powerful M3 Pro chip, 
        16GB unified memory, and 512GB SSD storage. Perfect for 
        professional video editing and software development.
        
        Category: Laptop Computer
        Status: In Stock
        Brand: Apple
    "</span><span class="p">;</span>

    <span class="k">let</span> <span class="n">llm</span> <span class="o">=</span> <span class="nn">OpenAILLM</span><span class="p">::</span><span class="nf">new</span><span class="p">(</span>
        <span class="o">&amp;</span><span class="nn">std</span><span class="p">::</span><span class="nn">env</span><span class="p">::</span><span class="nf">var</span><span class="p">(</span><span class="s">"SECRETARY_OPENAI_API_BASE"</span><span class="p">)</span><span class="nf">.unwrap</span><span class="p">(),</span>
        <span class="o">&amp;</span><span class="nn">std</span><span class="p">::</span><span class="nn">env</span><span class="p">::</span><span class="nf">var</span><span class="p">(</span><span class="s">"SECRETARY_OPENAI_API_KEY"</span><span class="p">)</span><span class="nf">.unwrap</span><span class="p">(),</span>
        <span class="o">&amp;</span><span class="nn">std</span><span class="p">::</span><span class="nn">env</span><span class="p">::</span><span class="nf">var</span><span class="p">(</span><span class="s">"SECRETARY_OPENAI_MODEL"</span><span class="p">)</span><span class="nf">.unwrap</span><span class="p">(),</span>
    <span class="p">)</span><span class="o">?</span><span class="p">;</span>

    <span class="nd">println!</span><span class="p">(</span><span class="s">"Making async request to LLM..."</span><span class="p">);</span>
    <span class="k">let</span> <span class="n">result</span><span class="p">:</span> <span class="n">ProductExtraction</span> <span class="o">=</span> <span class="n">llm</span>
        <span class="nf">.async_generate_data</span><span class="p">(</span><span class="o">&amp;</span><span class="n">task</span><span class="p">,</span> <span class="n">product_text</span><span class="p">,</span> <span class="o">&amp;</span><span class="n">additional_instructions</span><span class="p">)</span>
        <span class="k">.await</span><span class="o">?</span><span class="p">;</span>
    <span class="nd">println!</span><span class="p">(</span><span class="s">"Generated Data Structure: {:#?}"</span><span class="p">,</span> <span class="n">result</span><span class="p">);</span>

    <span class="nf">Ok</span><span class="p">(())</span>
<span class="p">}</span>
</code></pre></div></div>

<p>The <code class="language-plaintext highlighter-rouge">result</code> variable at the end of the snippet is our processed data. Now, in a macro, we don’t process data - we process code. When I mark a struct with derive macros and traits like this:</p>

<div class="language-rust highlighter-rouge"><div class="highlight"><pre class="highlight"><code><span class="nd">#[derive(Task,</span> <span class="nd">Serialize,</span> <span class="nd">Deserialize,</span> <span class="nd">Debug)]</span>
<span class="k">struct</span> <span class="n">ProductExtraction</span> <span class="p">{</span>
    <span class="nd">#[task(instruction</span> <span class="nd">=</span> <span class="s">"Extract the product name or title"</span><span class="nd">)]</span>
    <span class="k">pub</span> <span class="n">name</span><span class="p">:</span> <span class="nb">String</span><span class="p">,</span>

    <span class="nd">#[task(instruction</span> <span class="nd">=</span> <span class="s">"Extract key features or description"</span><span class="nd">)]</span>
    <span class="k">pub</span> <span class="n">description</span><span class="p">:</span> <span class="nb">String</span><span class="p">,</span>

    <span class="nd">#[task(instruction</span> <span class="nd">=</span> <span class="s">"Determine if the product is in stock (true/false)"</span><span class="nd">)]</span>
    <span class="k">pub</span> <span class="n">in_stock</span><span class="p">:</span> <span class="nb">bool</span><span class="p">,</span>

    <span class="k">pub</span> <span class="n">details</span><span class="p">:</span> <span class="n">Details</span><span class="p">,</span>
<span class="p">}</span>
</code></pre></div></div>

<p>I’m expecting the macro to generate trait implementations for <code class="language-plaintext highlighter-rouge">Task</code>, <code class="language-plaintext highlighter-rouge">Serialize</code>, <code class="language-plaintext highlighter-rouge">Deserialize</code>, and <code class="language-plaintext highlighter-rouge">Debug</code> specifically for this struct. This process happens before compilation, so when we actually run the code, all four traits’ methods will be ready for use. With a macro like this, my crate’s users don’t need to manually implement the relevant code.</p>

<h2 id="learning-approach-using-ai-as-a-collaborative-tool">Learning Approach: Using AI as a Collaborative Tool</h2>

<p>But I had to implement the macros, and before that, I needed to learn them first. In the past, I would need to go through lots of examples and documentation to figure out the basics. Now we have LLMs. I used an LLM as my tutor while learning. I first used an LLM to query against my codebase and asked about using a macro approach to generate the code. Then I did some research into the documentation to get a basic idea of macros in Rust.</p>

<p>I found the Rust Book to be an excellent starting point for learning new concepts. This initial research gave me a basic understanding of macros and was sufficient for writing instructions to an LLM to generate a basic macro for me. The first macro code in my crate was largely done by AI, but that only solved basic cases.</p>

<p>In my experience, AI can help kickstart development, but I found it insufficient for handling complex edge cases. After I released the crate and started using it in my projects, I discovered that proper macro design can handle complex scenarios including nested structs and field validation, even when the AI-generated code initially seemed limited.</p>

<p>I found that working with AI as a collaborative tool, rather than relying on it entirely, proved most effective. As I mentioned earlier, I didn’t just let the AI do the work - I did research beforehand. It’s like hiring someone to do work for me. I can’t just hand it over and expect them to do everything and know everything. If I don’t have the knowledge, things will derail, and that applies to AI coders too.</p>

<h2 id="the-second-learning-phase-diving-deeper">The Second Learning Phase: Diving Deeper</h2>

<p>When I started refactoring my crate, I approached learning macros with AI assistance once again. However, this time I found myself much more comfortable with the deeper aspects of macro development. The concepts that once seemed foggy began to crystallize.</p>

<p>Having AI-generated macros that were tightly connected to my specific use cases made it much easier to understand why and how each macro feature was implemented. This hands-on experience with real code was invaluable for building deeper understanding. In a nutshell, a procedural macro takes the marked code and processes it. In the following code snippet from my crate, it takes the marked code (the struct marked with <code class="language-plaintext highlighter-rouge">Task</code>) as an <code class="language-plaintext highlighter-rouge">input</code> variable, which is typed as <code class="language-plaintext highlighter-rouge">TokenStream</code>. A TokenStream is a representation of Rust code as a stream of tokens that can be manipulated programmatically:</p>

<div class="language-rust highlighter-rouge"><div class="highlight"><pre class="highlight"><code><span class="nd">#[proc_macro_derive(Task,</span> <span class="nd">attributes(task))]</span>
<span class="k">pub</span> <span class="k">fn</span> <span class="nf">derive_task</span><span class="p">(</span><span class="n">input</span><span class="p">:</span> <span class="n">TokenStream</span><span class="p">)</span> <span class="k">-&gt;</span> <span class="n">TokenStream</span> <span class="p">{</span>
    <span class="k">let</span> <span class="n">input</span><span class="p">:</span> <span class="n">DeriveInput</span> <span class="o">=</span> <span class="nd">parse_macro_input!</span><span class="p">(</span><span class="n">input</span> <span class="k">as</span> <span class="n">DeriveInput</span><span class="p">);</span>
    <span class="k">let</span> <span class="n">name</span><span class="p">:</span> <span class="o">&amp;</span><span class="nn">syn</span><span class="p">::</span><span class="n">Ident</span> <span class="o">=</span> <span class="o">&amp;</span><span class="n">input</span><span class="py">.ident</span><span class="p">;</span>
    <span class="k">let</span> <span class="k">mut</span> <span class="n">expanded</span><span class="p">:</span> <span class="nn">proc_macro2</span><span class="p">::</span><span class="n">TokenStream</span> <span class="o">=</span> <span class="nn">proc_macro2</span><span class="p">::</span><span class="nn">TokenStream</span><span class="p">::</span><span class="nf">new</span><span class="p">();</span>

    <span class="c1">// Extract field information for generating instructions</span>
    <span class="k">let</span> <span class="n">fields</span><span class="p">:</span> <span class="o">&amp;</span><span class="nn">syn</span><span class="p">::</span><span class="nn">punctuated</span><span class="p">::</span><span class="n">Punctuated</span><span class="o">&lt;</span><span class="nn">syn</span><span class="p">::</span><span class="n">Field</span><span class="p">,</span> <span class="nn">syn</span><span class="p">::</span><span class="nn">token</span><span class="p">::</span><span class="n">Comma</span><span class="o">&gt;</span> <span class="o">=</span> <span class="k">match</span> <span class="o">&amp;</span><span class="n">input</span><span class="py">.data</span> <span class="p">{</span><span class="o">...</span><span class="p">};</span>

    <span class="c1">// Validate</span>
    <span class="k">if</span> <span class="k">let</span> <span class="nf">Err</span><span class="p">(</span><span class="n">validation_error</span><span class="p">)</span> <span class="o">=</span> <span class="nf">validate_field_requirements</span><span class="p">(</span><span class="n">fields</span><span class="p">)</span> <span class="p">{</span>
        <span class="k">match</span> <span class="n">validation_error</span> <span class="p">{</span><span class="o">...</span><span class="p">}</span>
    <span class="p">}</span>

    <span class="c1">// Add `where` clause to fields with Task impl</span>
    <span class="k">let</span> <span class="n">task_field_types</span><span class="p">:</span> <span class="nb">Vec</span><span class="o">&lt;</span><span class="n">_</span><span class="o">&gt;</span> <span class="o">=</span> <span class="n">fields</span>
        <span class="nf">.iter</span><span class="p">()</span>
        <span class="nf">.filter</span><span class="p">(|</span><span class="n">field</span><span class="p">|</span> <span class="nf">classify_field_type</span><span class="p">(</span><span class="o">&amp;</span><span class="n">field</span><span class="py">.ty</span><span class="p">)</span> <span class="o">==</span> <span class="nn">FieldCategory</span><span class="p">::</span><span class="n">PotentialTask</span><span class="p">)</span>
        <span class="nf">.map</span><span class="p">(|</span><span class="n">field</span><span class="p">|</span> <span class="o">&amp;</span><span class="n">field</span><span class="py">.ty</span><span class="p">)</span>
        <span class="nf">.collect</span><span class="p">();</span>
    <span class="k">let</span> <span class="n">trait_bounds</span><span class="p">:</span> <span class="nn">proc_macro2</span><span class="p">::</span><span class="n">TokenStream</span> <span class="o">=</span> <span class="k">if</span> <span class="o">!</span><span class="n">task_field_types</span><span class="nf">.is_empty</span><span class="p">()</span> <span class="p">{</span>
        <span class="nd">quote!</span> <span class="p">{</span><span class="o">...</span><span class="p">}</span>
    <span class="p">}</span> <span class="k">else</span> <span class="p">{</span>
        <span class="nd">quote!</span> <span class="p">{}</span>
    <span class="p">};</span>

    <span class="c1">// Generate field instructions and expansion logic for normal json generation</span>
    <span class="k">let</span> <span class="n">field_expansions</span><span class="p">:</span> <span class="nb">Vec</span><span class="o">&lt;</span><span class="nn">proc_macro2</span><span class="p">::</span><span class="n">TokenStream</span><span class="o">&gt;</span> <span class="o">=</span> <span class="nf">implement_build_instruction_json</span><span class="p">(</span><span class="n">fields</span><span class="p">);</span>

    <span class="c1">// Generate field processing code for distributed generation</span>
    <span class="k">let</span> <span class="n">distributed_field_processing</span><span class="p">:</span> <span class="nb">Vec</span><span class="o">&lt;</span><span class="nn">proc_macro2</span><span class="p">::</span><span class="n">TokenStream</span><span class="o">&gt;</span> <span class="o">=</span>
        <span class="nf">implement_field_processing_code</span><span class="p">(</span><span class="n">fields</span><span class="p">);</span>

    <span class="n">expanded</span><span class="nf">.extend</span><span class="p">(</span><span class="nf">implement_default</span><span class="p">(</span><span class="o">&amp;</span><span class="n">name</span><span class="p">,</span> <span class="o">&amp;</span><span class="n">fields</span><span class="p">));</span>
    <span class="n">expanded</span><span class="nf">.extend</span><span class="p">(</span><span class="nf">implement_task</span><span class="p">(</span>
        <span class="o">&amp;</span><span class="n">name</span><span class="p">,</span>
        <span class="o">&amp;</span><span class="n">trait_bounds</span><span class="p">,</span>
        <span class="o">&amp;</span><span class="n">distributed_field_processing</span><span class="p">,</span>
    <span class="p">));</span>
    <span class="n">expanded</span><span class="nf">.extend</span><span class="p">(</span><span class="nd">quote!</span> <span class="p">{</span><span class="o">...</span><span class="p">});</span>

    <span class="nn">TokenStream</span><span class="p">::</span><span class="nf">from</span><span class="p">(</span><span class="n">expanded</span><span class="p">)</span>
<span class="p">}</span>
</code></pre></div></div>

<p>For simplicity, I removed the implementation details from the code block above, but the actual macro includes extensive validation, error handling, and field classification logic.</p>

<h2 id="three-core-concepts-of-procedural-macros">Three Core Concepts of Procedural Macros</h2>

<p>Through my experience, I discovered three core concepts that are essential for understanding procedural macros:</p>

<p><strong>1. TokenStream</strong>
A TokenStream is a representation of Rust code as a stream of tokens that can be manipulated programmatically. A procedural macro takes a TokenStream as input, modifies it, and eventually returns it as a TokenStream back to the compiler. Therefore, everything we do in the macro will eventually become compilable Rust code, no matter how fancy the intermediate process may appear.</p>

<p><strong>2. The <code class="language-plaintext highlighter-rouge">quote!</code> Macro</strong>
The <code class="language-plaintext highlighter-rouge">quote!</code> macro allows you to write Rust code that will be generated as tokens. It converts Rust syntax into a TokenStream. Inside the <code class="language-plaintext highlighter-rouge">quote!</code> macro, you can write the code that you want to generate. The return value of <code class="language-plaintext highlighter-rouge">quote!</code> is a TokenStream, and you can combine multiple TokenStreams together, which makes modularization in macros possible.</p>

<p><strong>3. Syntax Tree Manipulation</strong>
The ability to analyze and manipulate the original code structure using the parsed syntax tree allows you to extract information about fields, types, and attributes. This enables you to use the struct’s metadata to implement any methods or traits you want automatically.</p>

<h2 id="practical-implementation-examples">Practical Implementation Examples</h2>

<p>Let me show you how these concepts work together in practice. Here’s how I implement the Default trait automatically:</p>
<div class="language-rust highlighter-rouge"><div class="highlight"><pre class="highlight"><code><span class="k">pub</span> <span class="k">fn</span> <span class="nf">implement_default</span><span class="p">(</span>
    <span class="n">name</span><span class="p">:</span> <span class="o">&amp;</span><span class="n">Ident</span><span class="p">,</span>
    <span class="n">fields</span><span class="p">:</span> <span class="o">&amp;</span><span class="nn">syn</span><span class="p">::</span><span class="nn">punctuated</span><span class="p">::</span><span class="n">Punctuated</span><span class="o">&lt;</span><span class="nn">syn</span><span class="p">::</span><span class="n">Field</span><span class="p">,</span> <span class="nn">syn</span><span class="p">::</span><span class="nn">token</span><span class="p">::</span><span class="n">Comma</span><span class="o">&gt;</span><span class="p">,</span>
<span class="p">)</span> <span class="k">-&gt;</span> <span class="n">TokenStream</span> <span class="p">{</span>
    <span class="c1">// Assign default values to each field</span>
    <span class="k">let</span> <span class="n">field_defaults</span><span class="p">:</span> <span class="nb">Vec</span><span class="o">&lt;</span><span class="n">_</span><span class="o">&gt;</span> <span class="o">=</span> <span class="n">fields</span>
        <span class="nf">.iter</span><span class="p">()</span>
        <span class="nf">.map</span><span class="p">(|</span><span class="n">field</span><span class="p">|</span> <span class="p">{</span>
            <span class="k">let</span> <span class="n">field_name</span><span class="p">:</span> <span class="o">&amp;</span><span class="nn">syn</span><span class="p">::</span><span class="n">Ident</span> <span class="o">=</span> <span class="n">field</span><span class="py">.ident</span><span class="nf">.as_ref</span><span class="p">()</span><span class="nf">.unwrap</span><span class="p">();</span>
            <span class="nd">quote!</span> <span class="p">{</span>
                #<span class="n">field_name</span><span class="p">:</span> <span class="nn">Default</span><span class="p">::</span><span class="nf">default</span><span class="p">()</span>
            <span class="p">}</span>
        <span class="p">})</span>
        <span class="nf">.collect</span><span class="p">();</span>

    <span class="nd">quote!</span> <span class="p">{</span>
        <span class="k">impl</span> <span class="nb">Default</span> <span class="k">for</span> #<span class="n">name</span> <span class="p">{</span>
            <span class="k">fn</span> <span class="nf">default</span><span class="p">()</span> <span class="k">-&gt;</span> <span class="k">Self</span> <span class="p">{</span>
                <span class="k">Self</span> <span class="p">{</span>
                    #<span class="p">(</span>#<span class="n">field_defaults</span><span class="p">),</span><span class="o">*</span>
                <span class="p">}</span>
            <span class="p">}</span>
        <span class="p">}</span>
    <span class="p">}</span>
<span class="p">}</span>
</code></pre></div></div>

<p>This example demonstrates several important macro concepts working together:</p>

<p><strong>Identifiers in Rust Macros</strong>
An <code class="language-plaintext highlighter-rouge">ident</code> represents an identifier - things like variable names, function names, struct names, etc. Here, <code class="language-plaintext highlighter-rouge">field.ident.as_ref().unwrap()</code> extracts the name of each field (like <code class="language-plaintext highlighter-rouge">name</code>, <code class="language-plaintext highlighter-rouge">description</code>, <code class="language-plaintext highlighter-rouge">in_stock</code>) from the struct definition.</p>

<p><strong>Quote Macro Repetition Syntax</strong>
The <code class="language-plaintext highlighter-rouge">#(#field_defaults),*</code> syntax is a powerful <code class="language-plaintext highlighter-rouge">quote!</code> macro feature for generating repetitive code. The <code class="language-plaintext highlighter-rouge">#(...)</code> denotes a repetition block, <code class="language-plaintext highlighter-rouge">#field_defaults</code> is the variable to repeat over (our Vec of field assignments), and <code class="language-plaintext highlighter-rouge">,*</code> means “separate each item with a comma, and repeat zero or more times”. So if our struct has fields <code class="language-plaintext highlighter-rouge">name</code>, <code class="language-plaintext highlighter-rouge">description</code>, and <code class="language-plaintext highlighter-rouge">in_stock</code>, this pattern expands to:</p>

<div class="language-rust highlighter-rouge"><div class="highlight"><pre class="highlight"><code><span class="k">Self</span> <span class="p">{</span>
    <span class="n">name</span><span class="p">:</span> <span class="nn">Default</span><span class="p">::</span><span class="nf">default</span><span class="p">(),</span>
    <span class="n">description</span><span class="p">:</span> <span class="nn">Default</span><span class="p">::</span><span class="nf">default</span><span class="p">(),</span>
    <span class="n">in_stock</span><span class="p">:</span> <span class="nn">Default</span><span class="p">::</span><span class="nf">default</span><span class="p">(),</span>
<span class="p">}</span>
</code></pre></div></div>

<p><strong>Variable Interpolation</strong>
The <code class="language-plaintext highlighter-rouge">#name</code> represents the name of the struct we marked with <code class="language-plaintext highlighter-rouge">Task</code>. The <code class="language-plaintext highlighter-rouge">#</code> symbol interpolates variables defined outside the <code class="language-plaintext highlighter-rouge">quote!</code> macro into the generated code. This automation means users no longer need to manually implement Default for their structs - the macro handles it automatically! Following this pattern, you can implement any trait or method for the original struct.</p>

<h2 id="conclusion">Conclusion</h2>

<p>There are many aspects I didn’t cover in this post, such as setting up a derive crate for your project. These details are readily available online and through AI tools. What I wanted to share here are the key insights I gained while learning Rust metaprogramming and the journey that led me there.</p>

<p>After my second round of learning, I was able to dig much deeper into the subject. This experience reinforced that hands-on experience with real use cases is crucial for understanding complex concepts like macros. When I encountered obstacles, returning to fundamental documentation always helped me break through to the next level.</p>

<p>The secretary crate is fully open-sourced under the MIT license. I hope this post and the crate will be helpful to you in your own Rust journey. Feel free to leave feedback!</p>]]></content><author><name>Xinyu Bao</name></author><category term="Rust" /><category term="Macros" /><category term="Programming" /><category term="AI" /><category term="Learning" /><summary type="html"><![CDATA[Not just procedural macros, but macros in general, has been a difficult topic for me since my first hands-on experience with Rust. I never understood why they needed such complex syntax and abstraction layers. My perspective didn’t change until I started trying to improve my crate’s ergonomics.]]></summary></entry><entry xml:lang="zh-CN"><title type="html">开发一个用于自动化数据提取的 Rust 宏</title><link href="https://aspadax.github.io/cn/articles/posts/learning-rust-macros.html" rel="alternate" type="text/html" title="开发一个用于自动化数据提取的 Rust 宏" /><published>2024-12-19T00:00:00+08:00</published><updated>2024-12-19T00:00:00+08:00</updated><id>https://aspadax.github.io/cn/articles/posts/learning-rust-macros-cn</id><content type="html" xml:base="https://aspadax.github.io/cn/articles/posts/learning-rust-macros.html"><![CDATA[<p>不仅仅是过程宏 (procedural macros)，宏这个概念总体来说，自从我第一次实际接触 Rust 以来，一直是一个困难的话题。我一直不理解为什么它们需要如此复杂的语法和抽象层。直到我开始尝试提升我的 crate 的可用性 (ergonomics)，我的观点才改变。</p>

<h2 id="问题太多样板代码">问题：太多样板代码</h2>

<p>我创建了一个 crate，利用大型语言模型 (LLMs) 轻松生成 Rust 结构体。过去，当我需要从 LLM 中提取数据或某些结构化内容时，我需要定义一个结构体，设置调用 LLM 的样板代码，然后编写我的提示词。这在编码时很容易分散注意力。因此，我制作了 <a href="https://github.com/AspadaX/secretary">secretary</a>。</p>

<p>最终结果很惊人。现在我可以跳过所有这些重复步骤，只需简单定义一个结构体，如下所示：</p>

<div class="language-rust highlighter-rouge"><div class="highlight"><pre class="highlight"><code><span class="nd">#[derive(Task,</span> <span class="nd">Serialize,</span> <span class="nd">Deserialize,</span> <span class="nd">Debug)]</span>
<span class="k">struct</span> <span class="n">Details</span> <span class="p">{</span>
    <span class="nd">#[task(instruction</span> <span class="nd">=</span> <span class="s">"Extract the price as a float"</span><span class="nd">)]</span>
    <span class="k">pub</span> <span class="n">price</span><span class="p">:</span> <span class="nb">f64</span><span class="p">,</span>

    <span class="nd">#[task(instruction</span> <span class="nd">=</span> <span class="s">"Extract the product category or type"</span><span class="nd">)]</span>
    <span class="k">pub</span> <span class="n">category</span><span class="p">:</span> <span class="nb">String</span><span class="p">,</span>

    <span class="nd">#[task(instruction</span> <span class="nd">=</span> <span class="s">"Extract the brand name if mentioned"</span><span class="nd">)]</span>
    <span class="k">pub</span> <span class="n">brand</span><span class="p">:</span> <span class="nb">Option</span><span class="o">&lt;</span><span class="nb">String</span><span class="o">&gt;</span><span class="p">,</span>
<span class="p">}</span>

<span class="cd">/// 用于提取产品信息的示例数据结构</span>
<span class="nd">#[derive(Task,</span> <span class="nd">Serialize,</span> <span class="nd">Deserialize,</span> <span class="nd">Debug)]</span>
<span class="k">struct</span> <span class="n">ProductExtraction</span> <span class="p">{</span>
    <span class="cd">/// 带有特定提取指令的产品数据字段</span>
    <span class="nd">#[task(instruction</span> <span class="nd">=</span> <span class="s">"Extract the product name or title"</span><span class="nd">)]</span>
    <span class="k">pub</span> <span class="n">name</span><span class="p">:</span> <span class="nb">String</span><span class="p">,</span>

    <span class="nd">#[task(instruction</span> <span class="nd">=</span> <span class="s">"Extract key features or description"</span><span class="nd">)]</span>
    <span class="k">pub</span> <span class="n">description</span><span class="p">:</span> <span class="nb">String</span><span class="p">,</span>

    <span class="nd">#[task(instruction</span> <span class="nd">=</span> <span class="s">"Determine if the product is in stock (true/false)"</span><span class="nd">)]</span>
    <span class="k">pub</span> <span class="n">in_stock</span><span class="p">:</span> <span class="nb">bool</span><span class="p">,</span>

    <span class="k">pub</span> <span class="n">details</span><span class="p">:</span> <span class="n">Details</span><span class="p">,</span>
<span class="p">}</span>
</code></pre></div></div>

<h2 id="理解过程宏">理解过程宏</h2>

<p>如果你使用过 <code class="language-plaintext highlighter-rouge">serde</code> 或 <code class="language-plaintext highlighter-rouge">clap</code>，你会注意到结构体和字段上面的属性标注。在 Rust 中，这些是过程宏。在编译期间，这些宏在主要编译阶段之前会被扩展，生成额外的代码，以便运行时可以使用生成的实现，而无需手动编写所有这些。主要使用宏的目的是减少样板代码并最小化重复错误的机会。</p>

<p>Rust 有两种宏。第一种是声明宏 (declarative macros)，使用 <code class="language-plaintext highlighter-rouge">macro_rules!</code> 创建。这就是你在使用 <code class="language-plaintext highlighter-rouge">vec![]</code>、<code class="language-plaintext highlighter-rouge">println!()</code> 或 <code class="language-plaintext highlighter-rouge">info!()</code> 时通常看到的。你只需声明它们并在项目中使用它们。第二种称为过程宏 (procedural macros，有时缩写为 “proc macros”)。过程宏需要设置为独立的 crate，并且语法比声明宏更 “Rust 化”。要使用过程宏，你需要像库一样将其包含在你的 <code class="language-plaintext highlighter-rouge">Cargo.toml</code> 中。尽管它们之间有细微差别，但它们都做同样的事情——在编译前操纵代码。</p>

<h2 id="核心概念代码即数据">核心概念：代码即数据</h2>

<p>在学习宏的时候我意识到：函数处理数据并输出结果，而宏则处理代码并输出转换后的代码。</p>

<p>让我用一个实际示例来说明。在下面的简化代码片段中，我们使用 LLM 为我们提取数据。原始文本是数据输入，结果结构体是处理后的数据：</p>

<div class="language-rust highlighter-rouge"><div class="highlight"><pre class="highlight"><code><span class="nd">#[tokio::main]</span>
<span class="k">async</span> <span class="k">fn</span> <span class="nf">main</span><span class="p">()</span> <span class="k">-&gt;</span> <span class="nb">Result</span><span class="o">&lt;</span><span class="p">(),</span> <span class="nb">Box</span><span class="o">&lt;</span><span class="k">dyn</span> <span class="nn">std</span><span class="p">::</span><span class="nn">error</span><span class="p">::</span><span class="n">Error</span> <span class="o">+</span> <span class="nb">Send</span> <span class="o">+</span> <span class="nb">Sync</span> <span class="o">+</span> <span class="k">'static</span><span class="o">&gt;&gt;</span> <span class="p">{</span>
    <span class="c1">// 创建任务实例</span>
    <span class="k">let</span> <span class="n">task</span> <span class="o">=</span> <span class="nn">ProductExtraction</span><span class="p">::</span><span class="nf">new</span><span class="p">();</span>

    <span class="c1">// LLM 的额外指令</span>
    <span class="k">let</span> <span class="n">additional_instructions</span> <span class="o">=</span> <span class="nd">vec!</span><span class="p">[</span>
        <span class="s">"Be precise with numerical values"</span><span class="nf">.to_string</span><span class="p">(),</span>
        <span class="s">"Use 'Unknown' for missing information"</span><span class="nf">.to_string</span><span class="p">(),</span>
        <span class="s">"Ensure boolean values are accurate"</span><span class="nf">.to_string</span><span class="p">(),</span>
    <span class="p">];</span>

    <span class="c1">// 示例产品描述文本</span>
    <span class="k">let</span> <span class="n">product_text</span> <span class="o">=</span> <span class="s">"
        Apple MacBook Pro 16-inch - $2,499
        
        The latest MacBook Pro features the powerful M3 Pro chip, 
        16GB unified memory, and 512GB SSD storage. Perfect for 
        professional video editing and software development.
        
        Category: Laptop Computer
        Status: In Stock
        Brand: Apple
    "</span><span class="p">;</span>

    <span class="k">let</span> <span class="n">llm</span> <span class="o">=</span> <span class="nn">OpenAILLM</span><span class="p">::</span><span class="nf">new</span><span class="p">(</span>
        <span class="o">&amp;</span><span class="nn">std</span><span class="p">::</span><span class="nn">env</span><span class="p">::</span><span class="nf">var</span><span class="p">(</span><span class="s">"SECRETARY_OPENAI_API_BASE"</span><span class="p">)</span><span class="nf">.unwrap</span><span class="p">(),</span>
        <span class="o">&amp;</span><span class="nn">std</span><span class="p">::</span><span class="nn">env</span><span class="p">::</span><span class="nf">var</span><span class="p">(</span><span class="s">"SECRETARY_OPENAI_API_KEY"</span><span class="p">)</span><span class="nf">.unwrap</span><span class="p">(),</span>
        <span class="o">&amp;</span><span class="nn">std</span><span class="p">::</span><span class="nn">env</span><span class="p">::</span><span class="nf">var</span><span class="p">(</span><span class="s">"SECRETARY_OPENAI_MODEL"</span><span class="p">)</span><span class="nf">.unwrap</span><span class="p">(),</span>
    <span class="p">)</span><span class="o">?</span><span class="p">;</span>

    <span class="nd">println!</span><span class="p">(</span><span class="s">"Making async request to LLM..."</span><span class="p">);</span>
    <span class="k">let</span> <span class="n">result</span><span class="p">:</span> <span class="n">ProductExtraction</span> <span class="o">=</span> <span class="n">llm</span>
        <span class="nf">.async_generate_data</span><span class="p">(</span><span class="o">&amp;</span><span class="n">task</span><span class="p">,</span> <span class="n">product_text</span><span class="p">,</span> <span class="o">&amp;</span><span class="n">additional_instructions</span><span class="p">)</span>
        <span class="k">.await</span><span class="o">?</span><span class="p">;</span>
    <span class="nd">println!</span><span class="p">(</span><span class="s">"Generated Data Structure: {:#?}"</span><span class="p">,</span> <span class="n">result</span><span class="p">);</span>

    <span class="nf">Ok</span><span class="p">(())</span>
<span class="p">}</span>
</code></pre></div></div>

<p>代码片段末尾的 <code class="language-plaintext highlighter-rouge">result</code> 变量是我们处理后的数据。现在，在宏中，我们不处理数据——我们处理代码。当我使用派生宏 (derive macros) 和 trait 标记结构体时，如下所示：</p>

<div class="language-rust highlighter-rouge"><div class="highlight"><pre class="highlight"><code><span class="nd">#[derive(Task,</span> <span class="nd">Serialize,</span> <span class="nd">Deserialize,</span> <span class="nd">Debug)]</span>
<span class="k">struct</span> <span class="n">ProductExtraction</span> <span class="p">{</span>
    <span class="nd">#[task(instruction</span> <span class="nd">=</span> <span class="s">"Extract the product name or title"</span><span class="nd">)]</span>
    <span class="k">pub</span> <span class="n">name</span><span class="p">:</span> <span class="nb">String</span><span class="p">,</span>

    <span class="nd">#[task(instruction</span> <span class="nd">=</span> <span class="s">"Extract key features or description"</span><span class="nd">)]</span>
    <span class="k">pub</span> <span class="n">description</span><span class="p">:</span> <span class="nb">String</span><span class="p">,</span>

    <span class="nd">#[task(instruction</span> <span class="nd">=</span> <span class="s">"Determine if the product is in stock (true/false)"</span><span class="nd">)]</span>
    <span class="k">pub</span> <span class="n">in_stock</span><span class="p">:</span> <span class="nb">bool</span><span class="p">,</span>

    <span class="k">pub</span> <span class="n">details</span><span class="p">:</span> <span class="n">Details</span><span class="p">,</span>
<span class="p">}</span>
</code></pre></div></div>

<p>我期望宏为这个结构体生成 <code class="language-plaintext highlighter-rouge">Task</code>、<code class="language-plaintext highlighter-rouge">Serialize</code>、<code class="language-plaintext highlighter-rouge">Deserialize</code> 和 <code class="language-plaintext highlighter-rouge">Debug</code> 的 trait 实现。这个过程发生在编译之前，因此当我们实际运行代码时，所有四个 trait 的方法都将准备好使用。有了这样的宏，我的 crate 用户无需手动实现相关代码。</p>

<h2 id="学习方法使用-ai-作为协作工具">学习方法：使用 AI 作为协作工具</h2>

<p>但我必须实现这些宏，而在那之前，我需要先学习它们。过去，我需要浏览大量示例和文档来掌握基础知识。现在有了 LLM。我在学习时使用 LLM 作为我的导师。我首先使用 LLM 查询我的代码库，并询问使用宏方法生成代码。然后我对文档进行了一些研究，以获得 Rust 中宏的基本概念。</p>

<p>我发现 Rust Book 是学习新概念的绝佳起点。这个初步研究给了我宏的基本理解，并足以编写指令给 LLM 为我生成一个基本宏。我的 crate 中的第一个宏代码主要是由 AI 完成的，但那只解决了基本情况。</p>

<p>根据我的经验，AI 可以帮助启动开发，但对于处理复杂边缘情况，我发现它力不从心。在我发布 crate 并开始在我的项目中使用它后，我发现适当的宏设计可以处理复杂场景，包括嵌套结构体和字段验证，即使 AI 生成的代码最初显得有限。</p>

<p>我发现将 AI 作为协作工具，而不是完全依赖它，证明是最有效的。正如我之前提到的，我不仅仅让 AI 做工作——我在事先做了研究。这就像雇佣某人替我做事。我不能只是交给他们让他们干。如果我自己事先不清楚如何实现，事情就会朝着错误的方向发展，这也适用于 AI 生成代码。</p>

<h2 id="第二个学习阶段深入探索">第二个学习阶段：深入探索</h2>

<p>当我开始重构我的 crate 时，我再次在 AI 的辅助下学习宏。然而，这次我发现自己对宏开发的更深层方面要熟悉得多。曾经显得模糊的概念开始变得清晰。</p>

<p>拥有与我的特定用例紧密相关的 AI 生成宏，使得理解每个宏功能的为什么和如何实现变得容易得多。这种与真实代码的实际经验对于建立更深的理解是无价的。简而言之，过程宏获取标记的代码并处理它。在我的 crate 中的以下代码片段中，它将标记的代码（用 <code class="language-plaintext highlighter-rouge">Task</code> 标记的结构体）作为 <code class="language-plaintext highlighter-rouge">input</code> 变量，类型为 <code class="language-plaintext highlighter-rouge">TokenStream</code>。TokenStream 是 Rust 代码作为可编程操作的令牌流的表示：</p>

<div class="language-rust highlighter-rouge"><div class="highlight"><pre class="highlight"><code><span class="nd">#[proc_macro_derive(Task,</span> <span class="nd">attributes(task))]</span>
<span class="k">pub</span> <span class="k">fn</span> <span class="nf">derive_task</span><span class="p">(</span><span class="n">input</span><span class="p">:</span> <span class="n">TokenStream</span><span class="p">)</span> <span class="k">-&gt;</span> <span class="n">TokenStream</span> <span class="p">{</span>
    <span class="k">let</span> <span class="n">input</span><span class="p">:</span> <span class="n">DeriveInput</span> <span class="o">=</span> <span class="nd">parse_macro_input!</span><span class="p">(</span><span class="n">input</span> <span class="k">as</span> <span class="n">DeriveInput</span><span class="p">);</span>
    <span class="k">let</span> <span class="n">name</span><span class="p">:</span> <span class="o">&amp;</span><span class="nn">syn</span><span class="p">::</span><span class="n">Ident</span> <span class="o">=</span> <span class="o">&amp;</span><span class="n">input</span><span class="py">.ident</span><span class="p">;</span>
    <span class="k">let</span> <span class="k">mut</span> <span class="n">expanded</span><span class="p">:</span> <span class="nn">proc_macro2</span><span class="p">::</span><span class="n">TokenStream</span> <span class="o">=</span> <span class="nn">proc_macro2</span><span class="p">::</span><span class="nn">TokenStream</span><span class="p">::</span><span class="nf">new</span><span class="p">();</span>

    <span class="c1">// 提取字段信息以生成指令</span>
    <span class="k">let</span> <span class="n">fields</span><span class="p">:</span> <span class="o">&amp;</span><span class="nn">syn</span><span class="p">::</span><span class="nn">punctuated</span><span class="p">::</span><span class="n">Punctuated</span><span class="o">&lt;</span><span class="nn">syn</span><span class="p">::</span><span class="n">Field</span><span class="p">,</span> <span class="nn">syn</span><span class="p">::</span><span class="nn">token</span><span class="p">::</span><span class="n">Comma</span><span class="o">&gt;</span> <span class="o">=</span> <span class="k">match</span> <span class="o">&amp;</span><span class="n">input</span><span class="py">.data</span> <span class="p">{</span><span class="o">...</span><span class="p">};</span>

    <span class="c1">// 验证</span>
    <span class="k">if</span> <span class="k">let</span> <span class="nf">Err</span><span class="p">(</span><span class="n">validation_error</span><span class="p">)</span> <span class="o">=</span> <span class="nf">validate_field_requirements</span><span class="p">(</span><span class="n">fields</span><span class="p">)</span> <span class="p">{</span>
        <span class="k">match</span> <span class="n">validation_error</span> <span class="p">{</span><span class="o">...</span><span class="p">}</span>
    <span class="p">}</span>

    <span class="c1">// 为具有 Task 实现的字段添加 `where` 子句</span>
    <span class="k">let</span> <span class="n">task_field_types</span><span class="p">:</span> <span class="nb">Vec</span><span class="o">&lt;</span><span class="n">_</span><span class="o">&gt;</span> <span class="o">=</span> <span class="n">fields</span>
        <span class="nf">.iter</span><span class="p">()</span>
        <span class="nf">.filter</span><span class="p">(|</span><span class="n">field</span><span class="p">|</span> <span class="nf">classify_field_type</span><span class="p">(</span><span class="o">&amp;</span><span class="n">field</span><span class="py">.ty</span><span class="p">)</span> <span class="o">==</span> <span class="nn">FieldCategory</span><span class="p">::</span><span class="n">PotentialTask</span><span class="p">)</span>
        <span class="nf">.map</span><span class="p">(|</span><span class="n">field</span><span class="p">|</span> <span class="o">&amp;</span><span class="n">field</span><span class="py">.ty</span><span class="p">)</span>
        <span class="nf">.collect</span><span class="p">();</span>
    <span class="k">let</span> <span class="n">trait_bounds</span><span class="p">:</span> <span class="nn">proc_macro2</span><span class="p">::</span><span class="n">TokenStream</span> <span class="o">=</span> <span class="k">if</span> <span class="o">!</span><span class="n">task_field_types</span><span class="nf">.is_empty</span><span class="p">()</span> <span class="p">{</span>
        <span class="nd">quote!</span> <span class="p">{</span><span class="o">...</span><span class="p">}</span>
    <span class="p">}</span> <span class="k">else</span> <span class="p">{</span>
        <span class="nd">quote!</span> <span class="p">{};</span>
    <span class="p">};</span>

    <span class="c1">// 为正常 JSON 生成生成字段指令和扩展逻辑</span>
    <span class="k">let</span> <span class="n">field_expansions</span><span class="p">:</span> <span class="nb">Vec</span><span class="o">&lt;</span><span class="nn">proc_macro2</span><span class="p">::</span><span class="n">TokenStream</span><span class="o">&gt;</span> <span class="o">=</span> <span class="nf">implement_build_instruction_json</span><span class="p">(</span><span class="n">fields</span><span class="p">);</span>

    <span class="c1">// 为分布式生成生成字段处理代码</span>
    <span class="k">let</span> <span class="n">distributed_field_processing</span><span class="p">:</span> <span class="nb">Vec</span><span class="o">&lt;</span><span class="nn">proc_macro2</span><span class="p">::</span><span class="n">TokenStream</span><span class="o">&gt;</span> <span class="o">=</span>
        <span class="nf">implement_field_processing_code</span><span class="p">(</span><span class="n">fields</span><span class="p">);</span>

    <span class="n">expanded</span><span class="nf">.extend</span><span class="p">(</span><span class="nf">implement_default</span><span class="p">(</span><span class="o">&amp;</span><span class="n">name</span><span class="p">,</span> <span class="o">&amp;</span><span class="n">fields</span><span class="p">));</span>
    <span class="n">expanded</span><span class="nf">.extend</span><span class="p">(</span><span class="nf">implement_task</span><span class="p">(</span>
        <span class="o">&amp;</span><span class="n">name</span><span class="p">,</span>
        <span class="o">&amp;</span><span class="n">trait_bounds</span><span class="p">,</span>
        <span class="o">&amp;</span><span class="n">distributed_field_processing</span><span class="p">,</span>
    <span class="p">));</span>
    <span class="n">expanded</span><span class="nf">.extend</span><span class="p">(</span><span class="nd">quote!</span> <span class="p">{</span><span class="o">...</span><span class="p">});</span>

    <span class="nn">TokenStream</span><span class="p">::</span><span class="nf">from</span><span class="p">(</span><span class="n">expanded</span><span class="p">)</span>
<span class="p">}</span>
</code></pre></div></div>

<p>为了简单起见，我从上面的代码块中删除了实现细节，但实际宏包括广泛的验证、错误处理和字段分类逻辑。</p>

<h2 id="过程宏的三个核心概念">过程宏的三个核心概念</h2>

<p>通过我的经验，我发现了理解过程宏的三个核心概念：</p>

<p><strong>1. TokenStream</strong>
TokenStream 是 Rust 代码作为可编程操作的令牌流的表示。过程宏将 TokenStream 作为输入，修改它，并最终将其作为 TokenStream 返回给编译器。因此，我们在宏中做的所有事情最终都会成为可编译的 Rust 代码，无论中间过程看起来多么花哨。</p>

<p><strong>2. <code class="language-plaintext highlighter-rouge">quote!</code> 宏</strong>
<code class="language-plaintext highlighter-rouge">quote!</code> 宏允许你编写将作为令牌生成的 Rust 代码。它将 Rust 语法转换为 TokenStream。在 <code class="language-plaintext highlighter-rouge">quote!</code> 宏内部，你可以编写你想要生成的代码。<code class="language-plaintext highlighter-rouge">quote!</code> 的返回值是一个 TokenStream，你可以组合多个 TokenStream，这使得宏中的模块化成为可能。</p>

<p><strong>3. 语法树操作</strong>
使用解析的语法树分析和操作原始代码结构的能力允许你提取关于字段、类型和属性的信息。这使你能够使用结构体的元数据自动实现你想要的任何方法或 trait。</p>

<h2 id="实际实现示例">实际实现示例</h2>

<p>让我向你展示这些概念如何协同工作。以下是我如何自动实现 Default trait：</p>

<div class="language-rust highlighter-rouge"><div class="highlight"><pre class="highlight"><code><span class="k">pub</span> <span class="k">fn</span> <span class="nf">implement_default</span><span class="p">(</span>
    <span class="n">name</span><span class="p">:</span> <span class="o">&amp;</span><span class="n">Ident</span><span class="p">,</span>
    <span class="n">fields</span><span class="p">:</span> <span class="o">&amp;</span><span class="nn">syn</span><span class="p">::</span><span class="nn">punctuated</span><span class="p">::</span><span class="n">Punctuated</span><span class="o">&lt;</span><span class="nn">syn</span><span class="p">::</span><span class="n">Field</span><span class="p">,</span> <span class="nn">syn</span><span class="p">::</span><span class="nn">token</span><span class="p">::</span><span class="n">Comma</span><span class="o">&gt;</span><span class="p">,</span>
<span class="p">)</span> <span class="k">-&gt;</span> <span class="n">TokenStream</span> <span class="p">{</span>
    <span class="c1">// 为每个字段分配默认值</span>
    <span class="k">let</span> <span class="n">field_defaults</span><span class="p">:</span> <span class="nb">Vec</span><span class="o">&lt;</span><span class="n">_</span><span class="o">&gt;</span> <span class="o">=</span> <span class="n">fields</span>
        <span class="nf">.iter</span><span class="p">()</span>
        <span class="nf">.map</span><span class="p">(|</span><span class="n">field</span><span class="p">|</span> <span class="p">{</span>
            <span class="k">let</span> <span class="n">field_name</span><span class="p">:</span> <span class="o">&amp;</span><span class="nn">syn</span><span class="p">::</span><span class="n">Ident</span> <span class="o">=</span> <span class="n">field</span><span class="py">.ident</span><span class="nf">.as_ref</span><span class="p">()</span><span class="nf">.unwrap</span><span class="p">();</span>
            <span class="nd">quote!</span> <span class="p">{</span>
                #<span class="n">field_name</span><span class="p">:</span> <span class="nn">Default</span><span class="p">::</span><span class="nf">default</span><span class="p">()</span>
            <span class="p">}</span>
        <span class="p">})</span>
        <span class="nf">.collect</span><span class="p">();</span>

    <span class="nd">quote!</span> <span class="p">{</span>
        <span class="k">impl</span> <span class="nb">Default</span> <span class="k">for</span> #<span class="n">name</span> <span class="p">{</span>
            <span class="k">fn</span> <span class="nf">default</span><span class="p">()</span> <span class="k">-&gt;</span> <span class="k">Self</span> <span class="p">{</span>
                <span class="k">Self</span> <span class="p">{</span>
                    #<span class="p">(</span>#<span class="n">field_defaults</span><span class="p">),</span><span class="o">*</span>
                <span class="p">}</span>
            <span class="p">}</span>
        <span class="p">}</span>
    <span class="p">}</span>
<span class="p">}</span>
</code></pre></div></div>

<p>这个示例展示了几个重要的宏概念协同工作：</p>

<p><strong>Rust 宏中的标识符</strong>
<code class="language-plaintext highlighter-rouge">ident</code> 表示标识符——如变量名、函数名、结构体名等。这里，<code class="language-plaintext highlighter-rouge">field.ident.as_ref().unwrap()</code> 从结构体定义中提取每个字段的名称（如 <code class="language-plaintext highlighter-rouge">name</code>、<code class="language-plaintext highlighter-rouge">description</code>、<code class="language-plaintext highlighter-rouge">in_stock</code>）。</p>

<p><strong>Quote 宏重复语法</strong>
<code class="language-plaintext highlighter-rouge">#(#field_defaults),*</code> 语法是 <code class="language-plaintext highlighter-rouge">quote!</code> 宏的一个强大功能，用于生成重复代码。<code class="language-plaintext highlighter-rouge">#(...)</code> 表示重复块，<code class="language-plaintext highlighter-rouge">#field_defaults</code> 是要重复的变量（我们的字段分配 Vec），<code class="language-plaintext highlighter-rouge"> ,*</code> 表示“用逗号分隔每个项，并重复零次或多次”。因此，如果我们的结构体有字段 <code class="language-plaintext highlighter-rouge">name</code>、<code class="language-plaintext highlighter-rouge">description</code> 和 <code class="language-plaintext highlighter-rouge">in_stock</code>，这个模式会扩展为：</p>

<div class="language-rust highlighter-rouge"><div class="highlight"><pre class="highlight"><code><span class="k">Self</span> <span class="p">{</span>
    <span class="n">name</span><span class="p">:</span> <span class="nn">Default</span><span class="p">::</span><span class="nf">default</span><span class="p">(),</span>
    <span class="n">description</span><span class="p">:</span> <span class="nn">Default</span><span class="p">::</span><span class="nf">default</span><span class="p">(),</span>
    <span class="n">in_stock</span><span class="p">:</span> <span class="nn">Default</span><span class="p">::</span><span class="nf">default</span><span class="p">(),</span>
<span class="p">}</span>
</code></pre></div></div>

<p><strong>变量插值</strong>
<code class="language-plaintext highlighter-rouge">#name</code> 表示用 <code class="language-plaintext highlighter-rouge">Task</code> 标记的结构体的名称。<code class="language-plaintext highlighter-rouge">#</code> 符号将 <code class="language-plaintext highlighter-rouge">quote!</code> 宏外部定义的变量插值到生成的代码中。这种自动化意味着用户不再需要手动为他们的结构体实现 Default——宏会自动处理！按照这个模式，你可以为原始结构体实现任何 trait 或方法。</p>

<h2 id="结论">结论</h2>

<p>在我的第二轮学习之后，我能够更深入地研究这个主题。这种经验强化了我的认识：实际经验与真实用例对于理解像宏这样的复杂概念至关重要。当我遇到障碍时，回到基础文档总是帮助我突破到下一个水平。</p>

<p>secretary crate 在 MIT 许可下完全开源。我希望这篇文章和 crate 在你的 Rust 之旅中对你有帮助。请随时留下反馈！</p>]]></content><author><name>Xinyu Bao</name></author><category term="Rust" /><category term="Macros" /><category term="Programming" /><category term="AI" /><category term="Learning" /><summary type="html"><![CDATA[不仅仅是过程宏 (procedural macros)，宏这个概念总体来说，自从我第一次实际接触 Rust 以来，一直是一个困难的话题。我一直不理解为什么它们需要如此复杂的语法和抽象层。直到我开始尝试提升我的 crate 的可用性 (ergonomics)，我的观点才改变。]]></summary></entry></feed>